SDDC SaltStack Modules – vRA edition

In this blog post I will go over the steps I took in order to to be able to query my vRA components from SaltStack using the SDDC SaltStack Modules. The SDDC SaltStack Modules were introduced in 2011. You can find the technical release blog here. The modules can be found on GitHub here. There is also a getting quick start guide that can be found here. The vRA module which needs to be installed manually can be found here.

The first step was to create the /srv/salt/_modules folder as it does not exist by default

mkdir -p /srv/salt/_modules

If you don’t have git installed it can be easily installed by running:

yum install -y git

This will also install the dependencies:

Once completed we can run the below to clone the repo. Make sure you are in the /srv/salt/_modules directory

git clone https://github.com/VMwareCMBUTMM/salt_module_for_vra.git

As per documentation the python script should be in /srv/salt/_modules/ however with the git clone it actually created a subdirectory. To fix it i ran:

mv /srv/salt/_modules/salt_module_for_vra/* /srv/salt/_modules/

Now that i had the module in the proper location, I had to let salt know by running a sync

salt-call saltutil.sync_modules

or to sync it across all minions

salt '*' saltutil.sync_modules

Looking at the api documentation found here i picked on getting detail for my vsphere cloud account using the get_ca_by_name function. For the purposes of my test i did a salt-call. Per the documentation we need to include the function, username, password and account. It looked like this in my environment:

salt-call vra.get_ca_by_name vra-01a.corp.local administrator password vcsa-01a
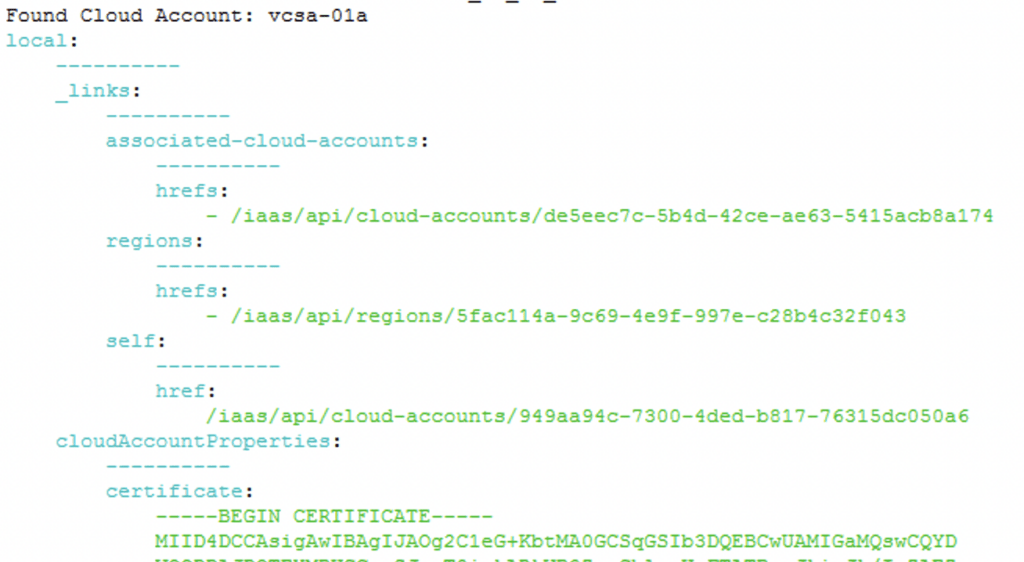
Next i wanted to see if i can create a cloud account. Based on the API reference i can use the create_vsphere_ca followed by vra_url, username, password, vcenter anme, vcenter username, vcenter password, name i want for the account, region to add from vcenter. It looked like this in my environment:

salt-call vra.create_vsphere_ca vra-01a.corp.local administrator password vcsa-01a.corp.local [email protected] password vcsa-01a Datacenter:datacenter-3

Once ran, i was able to verify in vRA that the account was created

As a remidner the API documentation can be found here

And the module can be downloaded from here

Next i would recommend looking at the example i have for vSphere found here

SDDC SaltStack Modules – vSphere edition

In this blog post I will go over the steps I took in order to to be able to query my vCenter components from SaltStack using the SDDC SaltStack Modules. The SDDC SaltStack Modules were introduced in 2011. You can find the technical release blog here. The modules can be found on GitHub here. There is also a getting quick start guide that can be found here.

I am using the pre packaged ova for deployment which includes most of the components however it does have some outdated packages. The first step for was to upgrade pip:

python3 -m pip install --upgrade pip

Install the saltext.vmware module by running

salt-call pip.install saltext.vmware

Next I had to create a pillar that includes the vCenter information for the connection details.

Actual code:

{
    "vmware_config": {
        "host": "vcsa-01a.corp.local",
        "password": "vcenter password",
        "user": "[email protected]"
    }
}

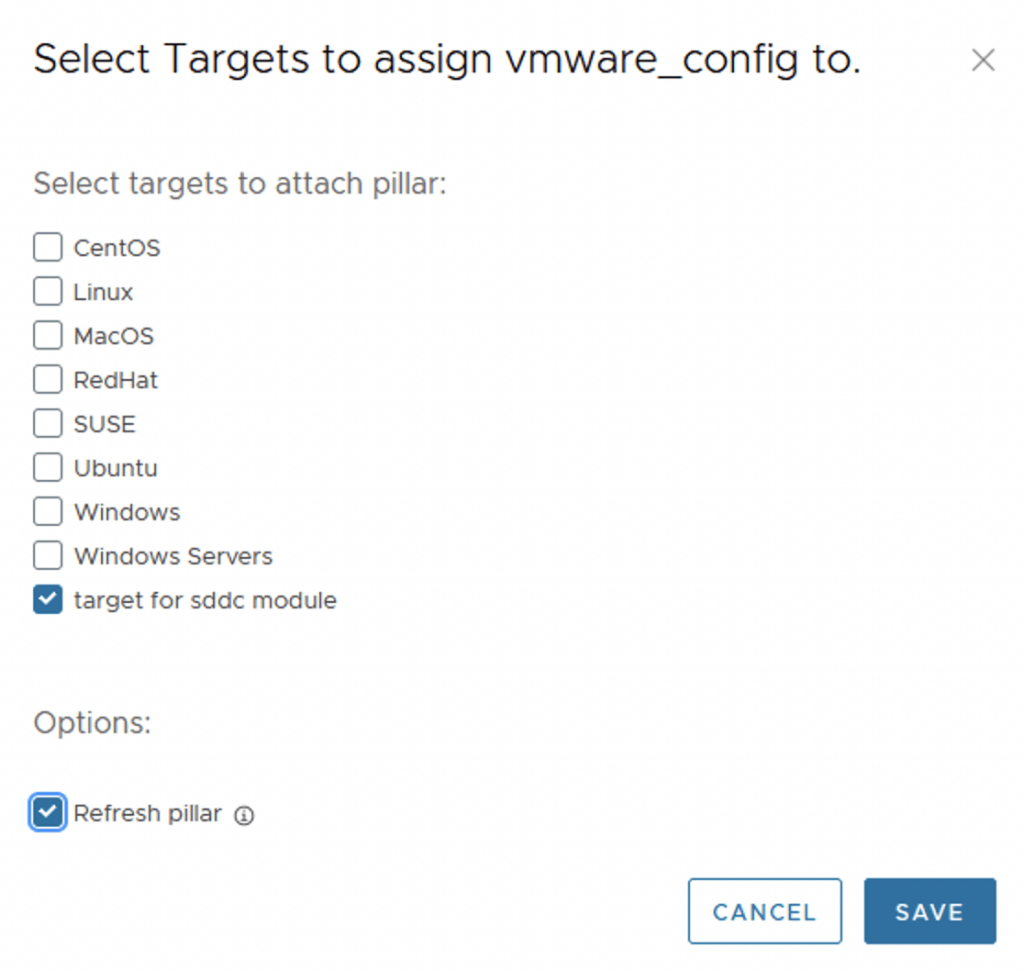
Next I had to attach the pillar to a target by clicking on update targets:

In my case I created a specific target that contained the minion where I want to run it from

Going to the minion I was able to verify that the pillar has been attached by running

salt-call pillar.items

The output shows exactly the data that I had in my pillar

Next I wanted to get the configuration for the MOTD. I was able to simply run the bellow command to get an output

salt-call vmware_esxi.get_advanced_config config_name=Config.Etc.motd

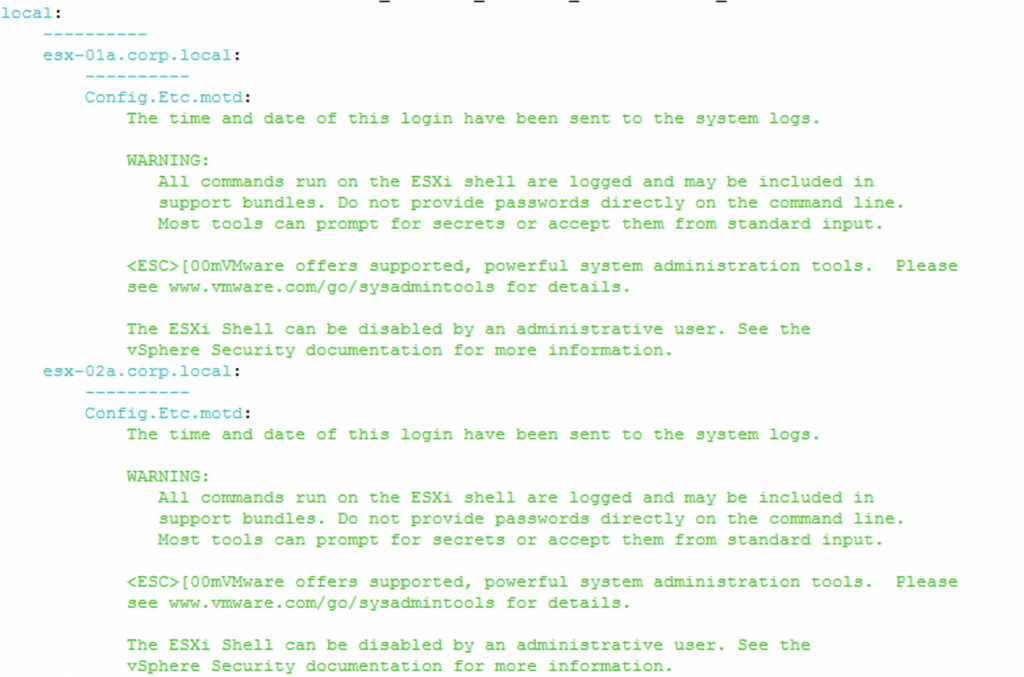
As we can see in the screenshot below all hosts in my vCenter that had Config.Etc.motd as an configuration item reported their configuration

Additionally I was also able to check that the configuration exists in vCenter under the Advanced host configuration example:

Next I wanted to see if I can push a specific configuration change.

salt-call vmware_esxi.set_advanced_config config_name=Config.Etc.motd host_name=esx-01a.corp.local  config_value=Hello

The return was

Checking the vSphere UI I was able to verify that the change was actually pushed through

Next I wanted to add it to the SaltStack UI in order for other team members to be able to use this functionality

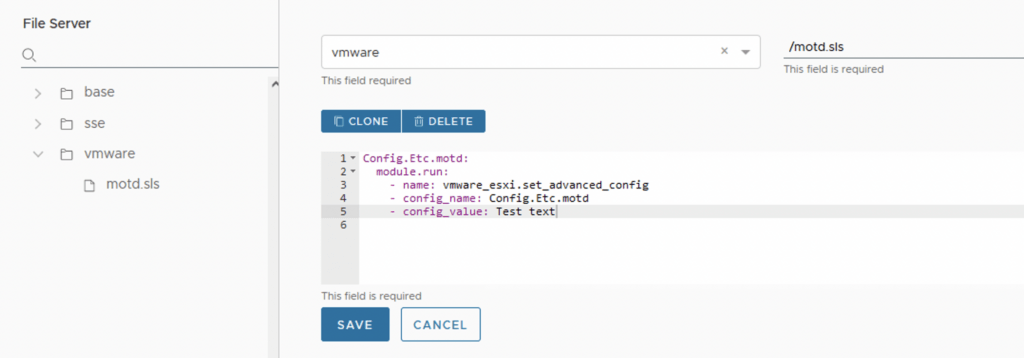
First I navigated to SaltStack Config -> Config -> File Server. I also created another environment called vmware and inside it I created my motd.sls

The sls file had the following:

Config.Etc.motd:
  module.run:
    - name: vmware_esxi.set_advanced_config
    - config_name: Config.Etc.motd
    - config_value: Test text

If you are not familiar with the sls construct here is an explanation on where the values came from:

Config.Etc.motd: - Just a title
  module.run: - this tells salt to run the module
    - name: vmware_esxi.set_advanced_config - the name of the module that needs to be ran
    - config_name: Config.Etc.motd - The config name from vCenter
    - config_value: Test text - The Actual value to write

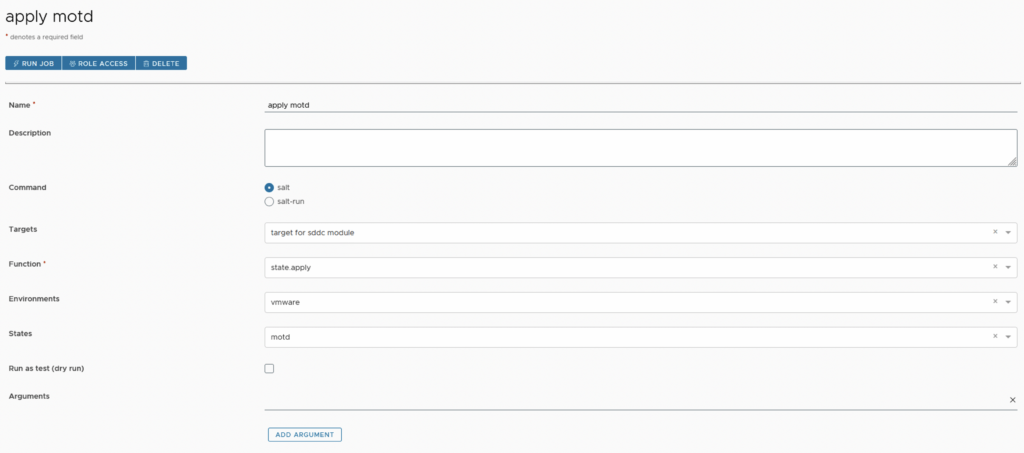
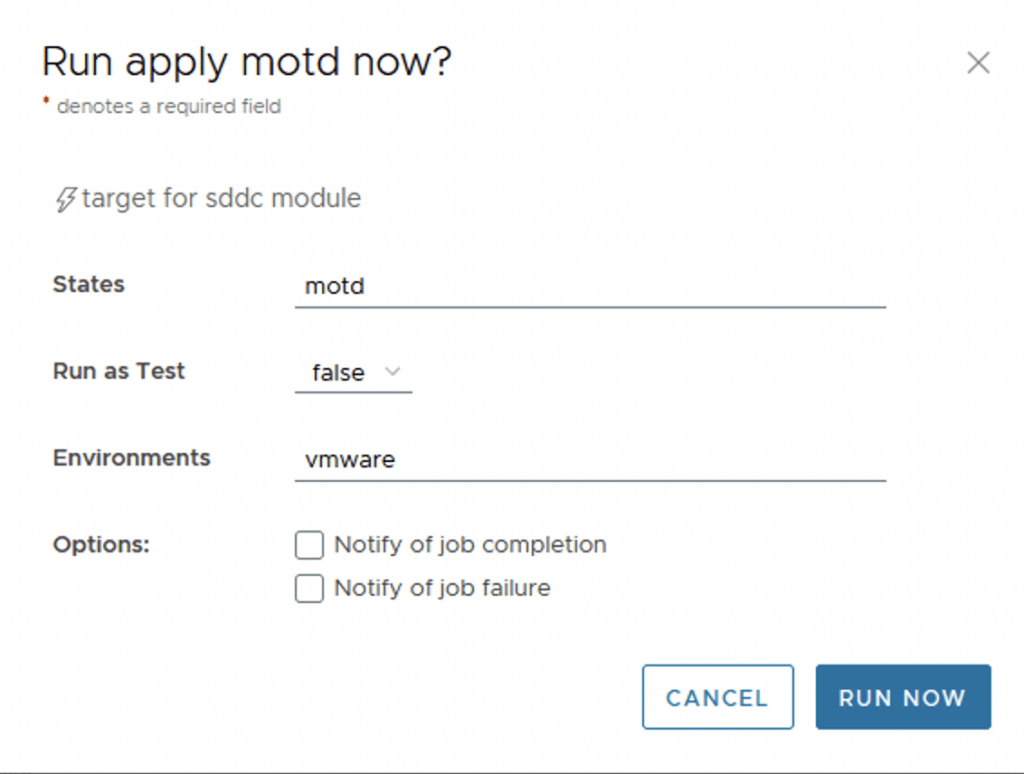
Next I wanted to create a job so it can be around for future use. In the SaltStack Config UI I navigated to Config -> Jobs -> Create job

Once I saved the job I was able to go ahead and apply it by running it

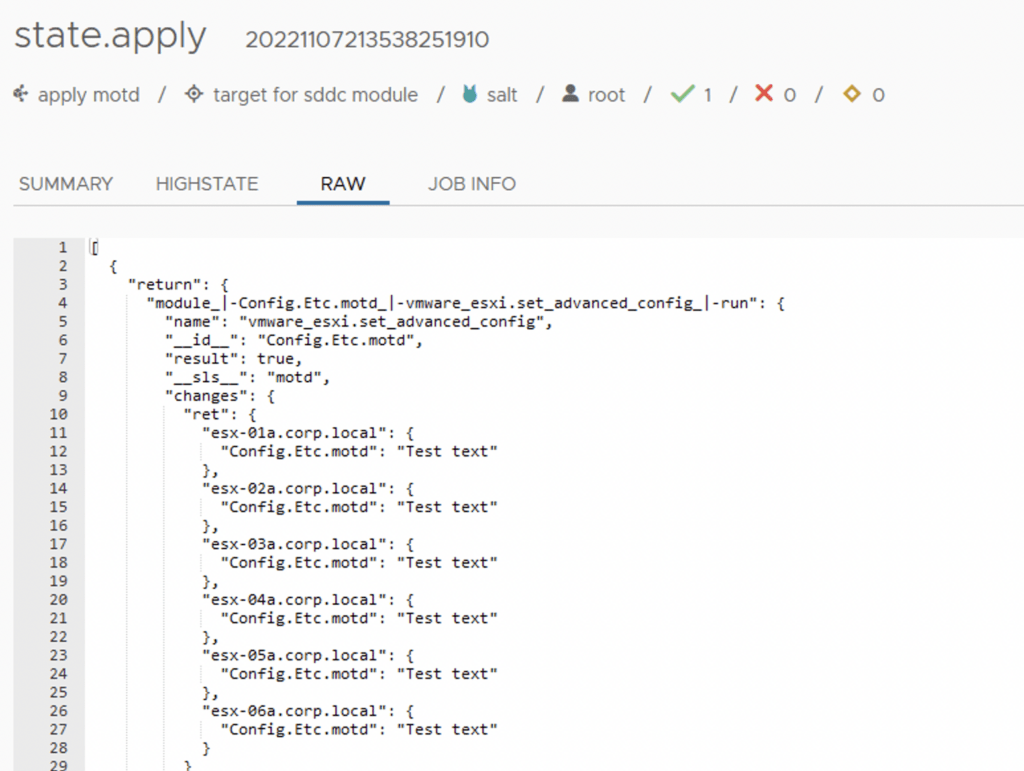
Post completion I was able to verify that my state apply applied the desired configuration across all of my hosts in vCenter

From a vCenter perspective I was also able to double check that the config has actually changed

The additional modules can be found here

The other vSphere modules can be found here

Upgrading SSC (SaltStack Config) to 8.10 using vRSLCM

In this post i will go over upgrading my 8.x SSC appliance to 8.10. As a pre requirement we do need to have vRSLCM (vRealize Lifecycle Manager) upgraded to 8.10. Instructions can be found here. The upgrade already includes the latest management pack so a management pack upgrade is not required in this case.

To get started we can go to vRealize Lifecycle Manager -> Lifecycle Operations -> Settings -> Binary Mapping. (If you haven’t added your My VMware credentials you will need to do that first by going to vRealize Lifecycle Manager -> Lifecycle Operations -> Settings -> My VMware)

Click on Add Binaries under Product Binaries

Select My VMware and click on Discover

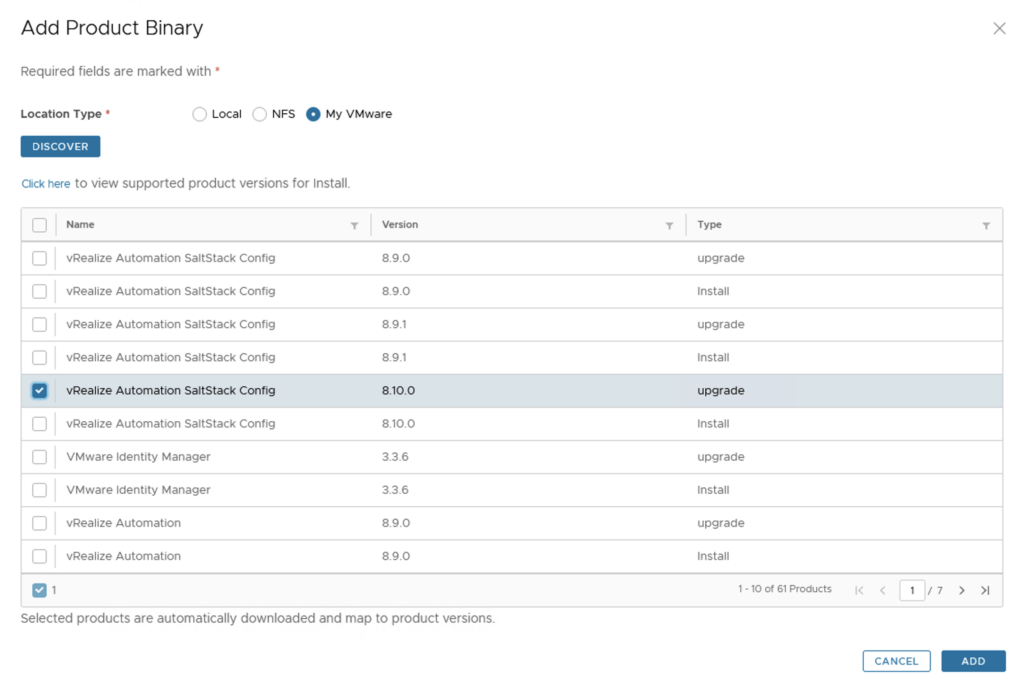
We can see a list of binaries that have been discovered. We can select what we need and click on Add

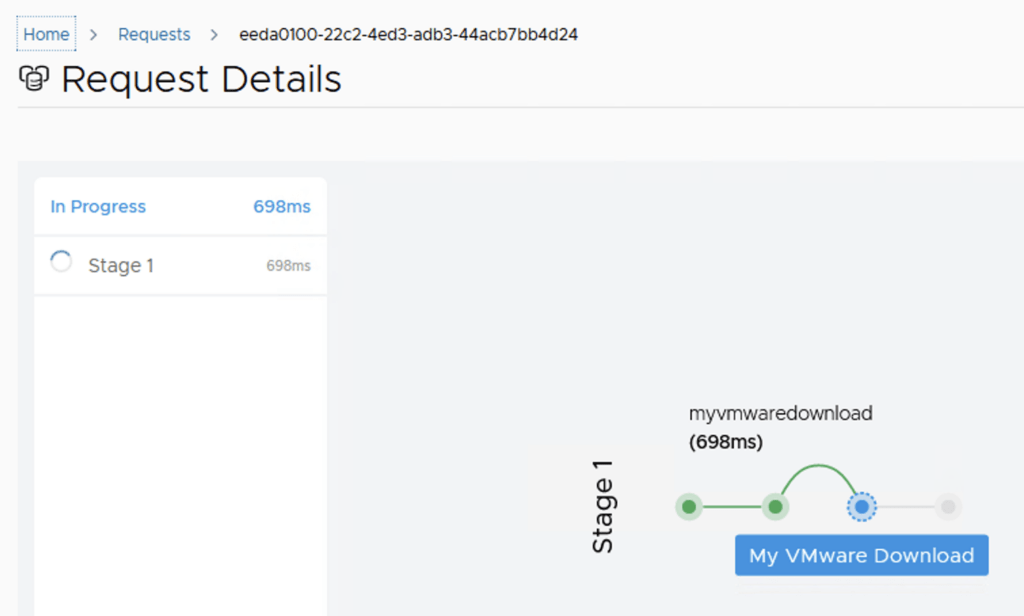
This will create a request and start downloading the package. To view the progress we can click on the Click Here hyperlink

Click on the in Progress button to view the details

We now have to wait for the download to complete

After the download is complete we can go to Environments -> View Details on the environment that includes SSC

Click on Upgrade

An Inventory sync is recommended if the environment has changed since LCM performed the last sync. We trigger the sync from the UI or click on Proceed to continue

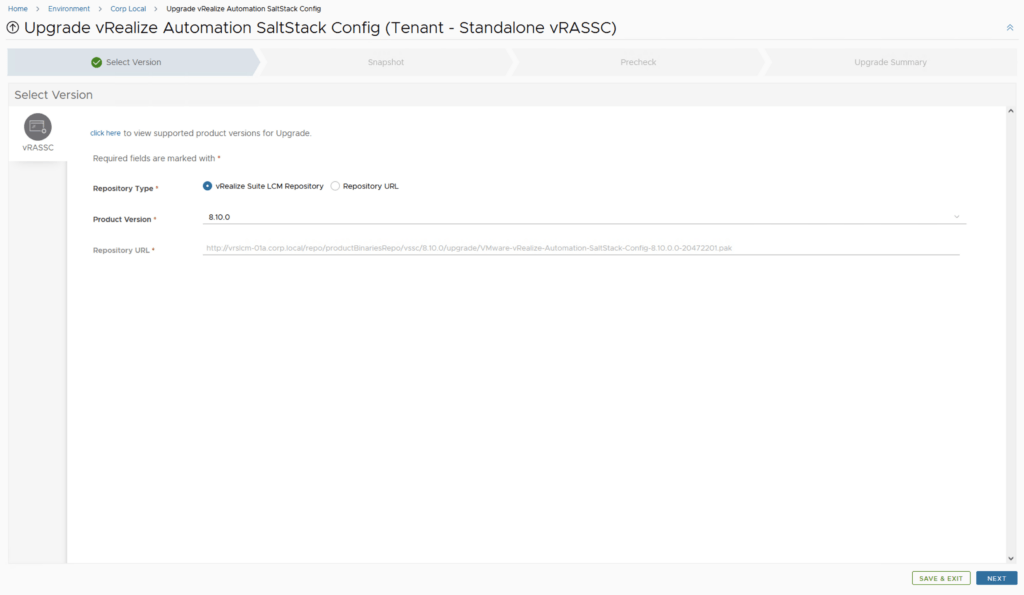
Select product Version 8.10 and click Next. We can also review the compatibility matrix to make sure the environment is compatible.

We can automatically create and delete a snapshot part of the upgrade process

Run the Precheck to make sure there are no errors

Once the check is complete, click on Next. Review the upgrade details and click on Next. We are taken to the progress screen where we can follow the progress.

The system will get rebooted and once its back up we will be on 8.10

Here are a few additional blogs that might be useful post upgrade:

Error Code: LCMVSSC10018

SSC 8.8 sseapi_rpc_queue: could not connect to SSE server

SSC 8.8 urllib3 (1.25.11) or chardet (4.0.0) doesn’t match a supported version

Authentication failed: no Authorization header

Upgrading vRSLCM (vRealize Lifecycle Manager) to 8.10

In this guide i will go over the steps of getting an existing 8.x vRSLCM appliance upgraded to the latest 8.10 release. The release notes can be found here
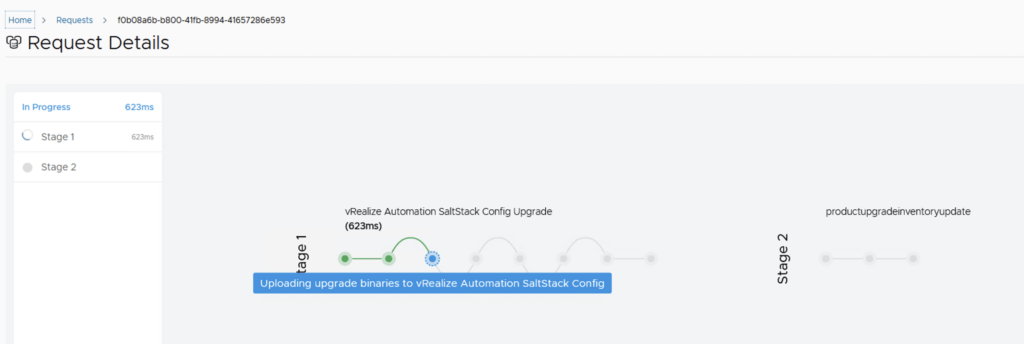
The first step is to log in to vRealize Suite Lifecycle Manager under the Lifecycle Operations section

Go to settings -> System Upgrade

Click on Check for Upgrade

We can see that the check found a new version available for 8.10

Click on Upgrade

Verify that a snapshot or backup exists in case the process fails. Check the check mark for I took a snapshot of the vRealize Suite Lifecycle Manager before I performed this operation. Click Next

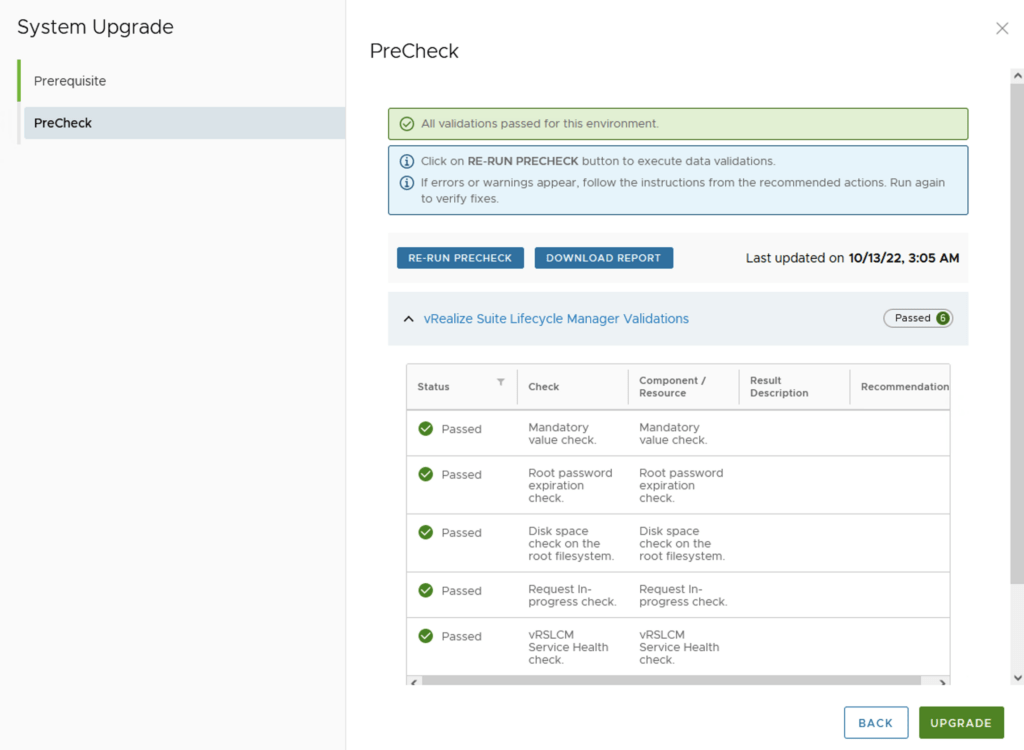
Click on Run Precheck

Verify that all check have passed and click on upgrade

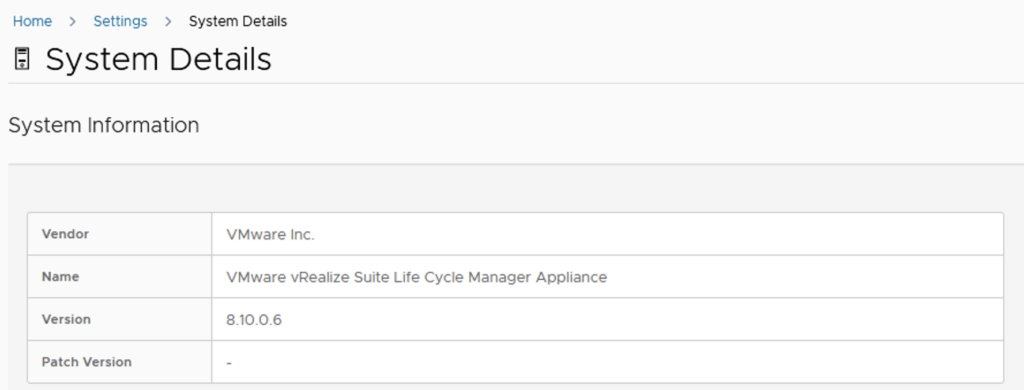
This will fire up the upgrade process and start upgrading packages. The system will automatically reboot on 8.10 once completed. We can check the version by going to Settings -> System Details

If you get the below error clear the browser cache and try again

Upgrading SSC (SaltStack Config) to 8.9.1 using vRSLCM

In this post i will go over upgrading my 8.x SSC appliance to 8.9.1. As a pre requirement we do need to have vRSLCM (vRealize Lifecycle Manager) upgraded to 8.8.2. Instructions can be found here. The upgrade doesn’t include the required Product support pack. Instructions on how to get the latest support pack can be found here.

To get started we can go to vRealize Lifecycle Manager -> Lifecycle Operations -> Settings -> Binary Mapping. (If you haven’t added your My VMware credentials you will need to do that first by going to vRealize Lifecycle Manager -> Lifecycle Operations -> Settings -> My VMware)

Click on Add Binaries under Product Binaries

Select My VMware and click on Discover

We can see a list of binaries that have been discovered. We can select what we need and click on Add

This will create a request and start downloading the package. To view the progress we can click on the Click Here hyperlink

Click on the in Progress button to view the details

We now have to wait for the download to complete

After the download is complete we can go to Environments -> View Details on the environment that includes SSC

Click on Upgrade

An Inventory sync is recommended if the environment has changed since LCM performed the last sync. We trigger the sync from the UI or click on Proceed to continue

Select product Version 8.9.1 and click Next. We can also review the compatibility matrix to make sure the environment is compatible.

We can automatically create and delete a snapshot part of the upgrade process

Run the Precheck to make sure there are no errors

Once the check is complete, click on Next. Review the upgrade details and click on Next. We are taken to the progress screen where we can follow the progress.

The system will get rebooted and once its back up we will be on 8.9.1

Here are a few additional blogs that might be useful post upgrade:

Error Code: LCMVSSC10018

SSC 8.8 sseapi_rpc_queue: could not connect to SSE server

SSC 8.8 urllib3 (1.25.11) or chardet (4.0.0) doesn’t match a supported version

Authentication failed: no Authorization header

Upgrading vRA (vRealize Automation) to 8.9.1

In this post i will go over upgrading my 8.x vRA appliance to 8.9. As a pre requirement we do need to have vRSLCM (vRealize Lifecycle Manager) upgraded to 8.8.2 Instructions can be found here. The upgrade doesn’t include the required Product support pack. Instructions on how to get the latest product support pack can be found here.

To get started we can go to vRealize Lifecycle Manager -> Lifecycle Operations -> Settings -> Binary Mapping. (If you haven’t added your My VMware credentials you will need to do that first by going to vRealize Lifecycle Manager -> Lifecycle Operations -> Settings -> My VMware)

Click on Add Binaries under Product Binaries

Select My VMware and click on Discover

We can see a list of binaries that have been discovered. We can select what we need and click on Add

This will create a request and start downloading the package. To view the progress we can click on the Click Here hyperlink

Click on the in Progress button to view the details

We now have to wait for the download to complete

After the download is complete we can go to Environments -> View Details on the environment that includes vRA

Click on Upgrade

An Inventory sync is recommended if the environment has changed since LCM performed the last sync. We trigger the sync from the UI or click on Proceed to continue

Select product Version 8.9.1 and click Next. We can also review the compatibility matrix to make sure the environment is compatible.

A new feature that was added was the capability to automatically create a snapshot prior to the upgrade and remove it after the upgrade. On this screen we also have the ability to chose if we want to keep the snapshots post upgrade for validation testing for example. Click next

Run the Precheck to make sure there are no errors

The next screen remind us of hardware requirements for vRA and vIDM which can be checked here for vRA and vIDM which can be checked here. As far as i can tell they haven’t changed since the 8.3 release. Check the I took care of the manual steps above and am ready to proceed check mark and click on Run Precheck
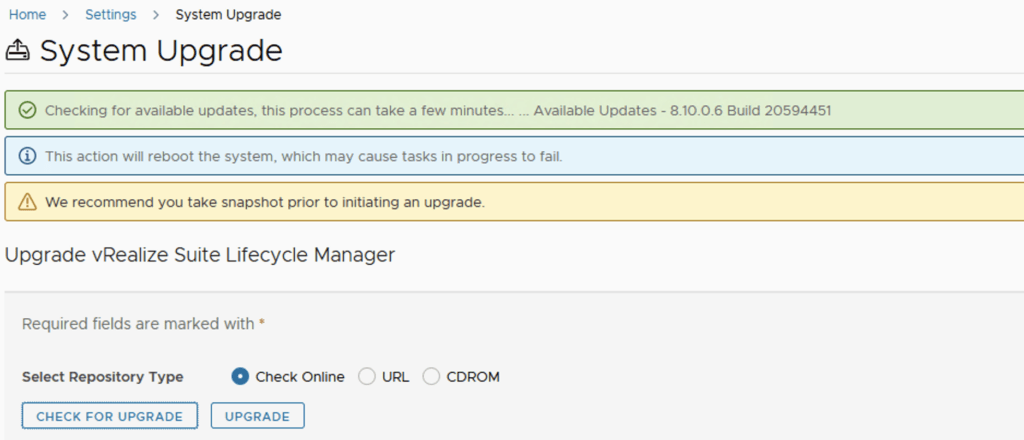
Once the check is complete we can review the checks that were performed and we can continue by clicking Next.

Review the upgrade details and click on Next. We are taken to the progress screen where we can follow the progress.

The system will get rebooted and once its back up we will be on 8.9.1

Since we are doing a major upgrade i strongly recommend to clean the cache before using the new vRA version.

Upgrading SSC (SaltStack Config) to 8.9 using vRSLCM

In this post i will go over upgrading my 8.x SSC appliance to 8.9. As a pre requirement we do need to have vRSLCM (vRealize Lifecycle Manager) upgraded to 8.8.2. Instructions can be found here. The upgrade doesn’t include the required Product support pack. Instructions on how to get the latest support pack can be found here.

To get started we can go to vRealize Lifecycle Manager -> Lifecycle Operations -> Settings -> Binary Mapping. (If you haven’t added your My VMware credentials you will need to do that first by going to vRealize Lifecycle Manager -> Lifecycle Operations -> Settings -> My VMware)

Click on Add Binaries under Product Binaries

Select My VMware and click on Discover

We can see a list of binaries that have been discovered. We can select what we need and click on Add

This will create a request and start downloading the package. To view the progress we can click on the Click Here hyperlink

Click on the in Progress button to view the details

We now have to wait for the download to complete

After the download is complete we can go to Environments -> View Details on the environment that includes SSC

Click on Upgrade

An Inventory sync is recommended if the environment has changed since LCM performed the last sync. We trigger the sync from the UI or click on Proceed to continue

Select product Version 8.8.2 and click Next. We can also review the compatibility matrix to make sure the environment is compatible.

We can automatically create and delete a snapshot part of the upgrade process

Run the Precheck to make sure there are no errors

Once the check is complete, click on Next. Review the upgrade details and click on Next. We are taken to the progress screen where we can follow the progress.

The system will get rebooted and once its back up we will be on 8.9

Here are a few additional blogs that might be useful post upgrade:

Error Code: LCMVSSC10018

SSC 8.8 sseapi_rpc_queue: could not connect to SSE server

SSC 8.8 urllib3 (1.25.11) or chardet (4.0.0) doesn’t match a supported version

Authentication failed: no Authorization header

Upgrading vRA (vRealize Automation) to 8.9.0

In this post i will go over upgrading my 8.x vRA appliance to 8.9. As a pre requirement we do need to have vRSLCM (vRealize Lifecycle Manager) upgraded to 8.8.2 Instructions can be found here. The upgrade doesn’t include the required Product support pack. Instructions on how to get the latest support pack can be found here.

To get started we can go to vRealize Lifecycle Manager -> Lifecycle Operations -> Settings -> Binary Mapping. (If you haven’t added your My VMware credentials you will need to do that first by going to vRealize Lifecycle Manager -> Lifecycle Operations -> Settings -> My VMware)

Click on Add Binaries under Product Binaries

Select My VMware and click on Discover

We can see a list of binaries that have been discovered. We can select what we need and click on Add

This will create a request and start downloading the package. To view the progress we can click on the Click Here hyperlink

Click on the in Progress button to view the details

We now have to wait for the download to complete

After the download is complete we can go to Environments -> View Details on the environment that includes vRA

Click on Upgrade

An Inventory sync is recommended if the environment has changed since LCM performed the last sync. We trigger the sync from the UI or click on Proceed to continue

Select product Version 8.9.0 and click Next. We can also review the compatibility matrix to make sure the environment is compatible.

A new feature that was added was the capability to automatically create a snapshot prior to the upgrade and remove it after the upgrade. On this screen we also have the ability to chose if we want to keep the snapshots post upgrade for validation testing for example. Click next

Run the Precheck to make sure there are no errors

The next screen remind us of hardware requirements for vRA and vIDM which can be checked here for vRA and vIDM which can be checked here. As far as i can tell they haven’t changed since the 8.3 release. Check the I took care of the manual steps above and am ready to proceed check mark and click on Run Precheck

Once the check is complete we can review the checks that were performed and we can continue by clicking Next.

Review the upgrade details and click on Next. We are taken to the progress screen where we can follow the progress.

The system will get rebooted and once its back up we will be on 8.9.0

Since we are doing a major upgrade i strongly recommend to clean the cache before using the new vRA version.

vRSLCM (vRealize Lifecycle Manager) Product Support Pack

In this guide i will go over the steps of getting an existing 8.x vRSLCM appliance to support the latest product releases available. Here is a great blog that goes in to the details about what the Product Support Pack is https://blogs.vmware.com/management/2019/01/vrslcm-pspak.html. Typically the newer Product Support Pack is included part of the upgrade for LCM, however sometimes there are product releases in between releases where product support packs come in handy.
The first step is to log in to vRealize Suite Lifecycle Manager under the Lifecycle Operations section

Go to settings -> Product Support Pack

We can see that i recently upgraded to 8.8.2.1 however a new update is available 8.8.2.2. Based on what we can see in the details the new support pack adds support for vRA 8.9.1. If an update is not available click on the Check Support Packs Online button and refresh the screen within a few minutes

Click on Apply Version

Verify that a snapshot or a backup exists and click Submit

We can view the progress by clicking on the Click Here link after submitting the request

Once the process is complete the system will most likely reboot. To check the status we can go back to settings -> Product Support Pack. As we can see we are now at the updated patch level

If you get the below error clear the browser cache and try again

Upgrading SSC (SaltStack Config) to 8.9 using vRSLCM

In this post i will go over upgrading my 8.x SSC appliance to 8.9. As a pre requirement we do need to have vRSLCM (vRealize Lifecycle Manager) upgraded to 8.8.2. The upgrade also requires the latest Product Support Pack to 8.8.2.1. The instructions to upgrade the management pack can be found here.

To get started we can go to vRealize Lifecycle Manager -> Lifecycle Operations -> Settings -> Binary Mapping. (If you haven’t added your My VMware credentials you will need to do that first by going to vRealize Lifecycle Manager -> Lifecycle Operations -> Settings -> My VMware)

Click on Add Binaries under Product Binaries

Select My VMware and click on Discover

We can see a list of binaries that have been discovered. We can select what we need and click on Add

This will create a request and start downloading the package. To view the progress we can click on the Click Here hyperlink

Click on the in Progress button to view the details

We now have to wait for the download to complete

After the download is complete we can go to Environments -> View Details on the environment that includes SSC

Click on Upgrade

An Inventory sync is recommended if the environment has changed since LCM performed the last sync. We trigger the sync from the UI or click on Proceed to continue

Select product Version 8.9 and click Next. We can also review the compatibility matrix to make sure the environment is compatible.

We can automatically create and delete a snapshot part of the upgrade process

Run the Precheck to make sure there are no errors

Once the check is complete, click on Next. Review the upgrade details and click on Next. We are taken to the progress screen where we can follow the progress.

The system will get rebooted and once its back up we will be on 8.9

Here are a few additional blogs that might be useful post upgrade:

Error Code: LCMVSSC10018

SSC 8.8 sseapi_rpc_queue: could not connect to SSE server

SSC 8.8 urllib3 (1.25.11) or chardet (4.0.0) doesn’t match a supported version

Authentication failed: no Authorization header