Browse Category

Uncategorized

SDDC SaltStack Modules – vSphere edition

In this blog post I will go over the steps I took in order to to be able to query my vCenter components from SaltStack using the SDDC SaltStack Modules. The SDDC SaltStack Modules were introduced in 2011. You can find the technical release blog here. The modules can be found on GitHub here. There is also a getting quick start guide that can be found here.

I am using the pre packaged ova for deployment which includes most of the components however it does have some outdated packages. The first step for was to upgrade pip:

python3 -m pip install --upgrade pip

Install the saltext.vmware module by running

salt-call pip.install saltext.vmware

Next I had to create a pillar that includes the vCenter information for the connection details.

Actual code:

{
    "vmware_config": {
        "host": "vcsa-01a.corp.local",
        "password": "vcenter password",
        "user": "[email protected]"
    }
}

Next I had to attach the pillar to a target by clicking on update targets:

In my case I created a specific target that contained the minion where I want to run it from
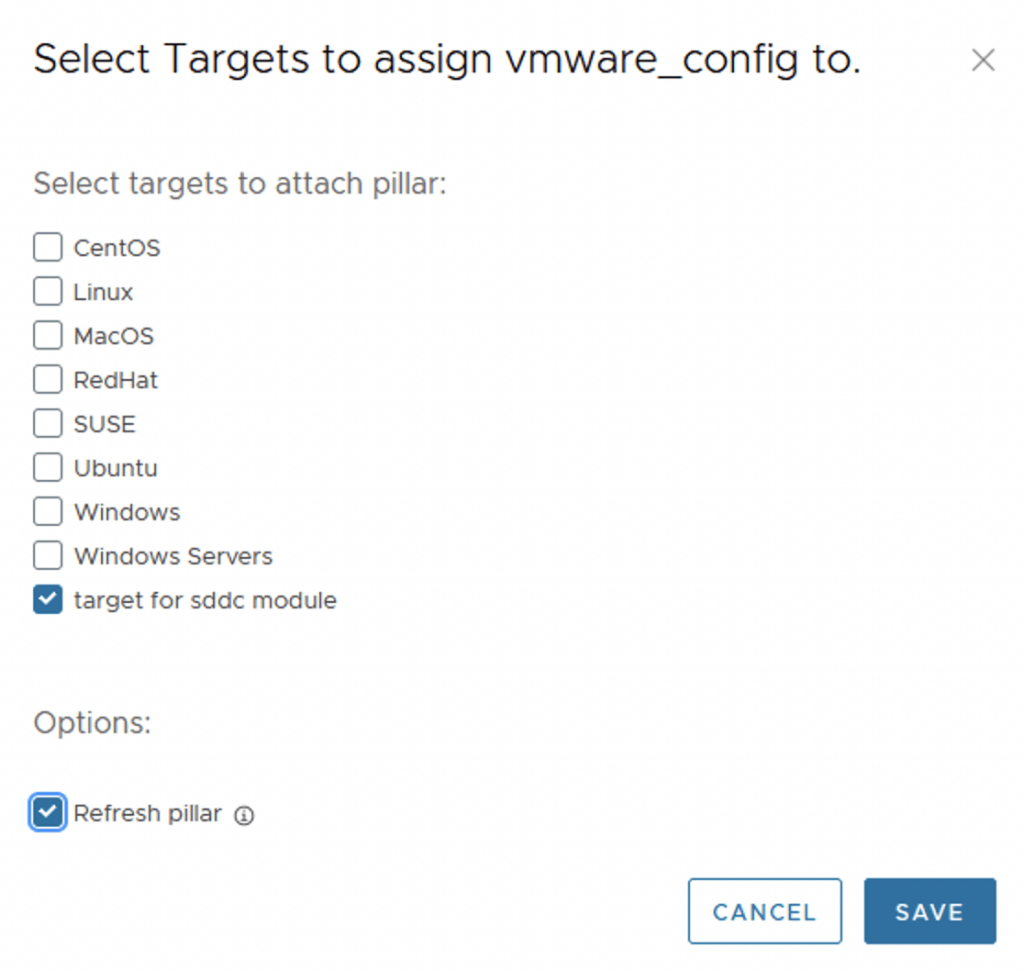
Going to the minion I was able to verify that the pillar has been attached by running

salt-call pillar.items

The output shows exactly the data that I had in my pillar

Next I wanted to get the configuration for the MOTD. I was able to simply run the bellow command to get an output

salt-call vmware_esxi.get_advanced_config config_name=Config.Etc.motd

As we can see in the screenshot below all hosts in my vCenter that had Config.Etc.motd as an configuration item reported their configuration
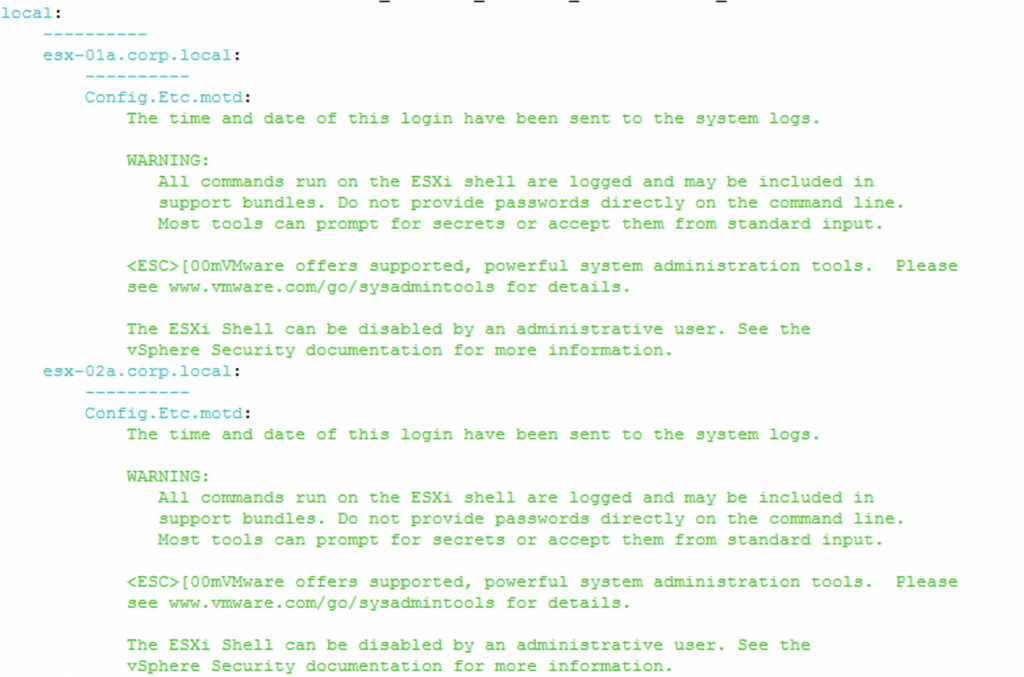
Additionally I was also able to check that the configuration exists in vCenter under the Advanced host configuration example:

Next I wanted to see if I can push a specific configuration change.

salt-call vmware_esxi.set_advanced_config config_name=Config.Etc.motd host_name=esx-01a.corp.local  config_value=Hello

The return was

Checking the vSphere UI I was able to verify that the change was actually pushed through

Next I wanted to add it to the SaltStack UI in order for other team members to be able to use this functionality

First I navigated to SaltStack Config -> Config -> File Server. I also created another environment called vmware and inside it I created my motd.sls
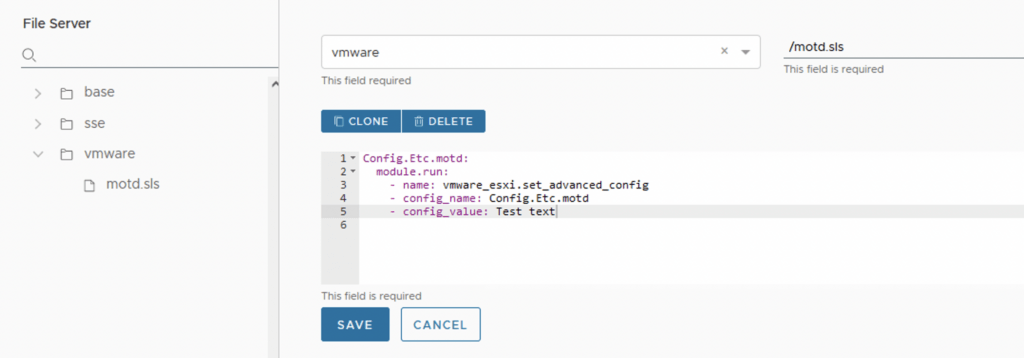
The sls file had the following:

Config.Etc.motd:
  module.run:
    - name: vmware_esxi.set_advanced_config
    - config_name: Config.Etc.motd
    - config_value: Test text

If you are not familiar with the sls construct here is an explanation on where the values came from:

Config.Etc.motd: - Just a title
  module.run: - this tells salt to run the module
    - name: vmware_esxi.set_advanced_config - the name of the module that needs to be ran
    - config_name: Config.Etc.motd - The config name from vCenter
    - config_value: Test text - The Actual value to write

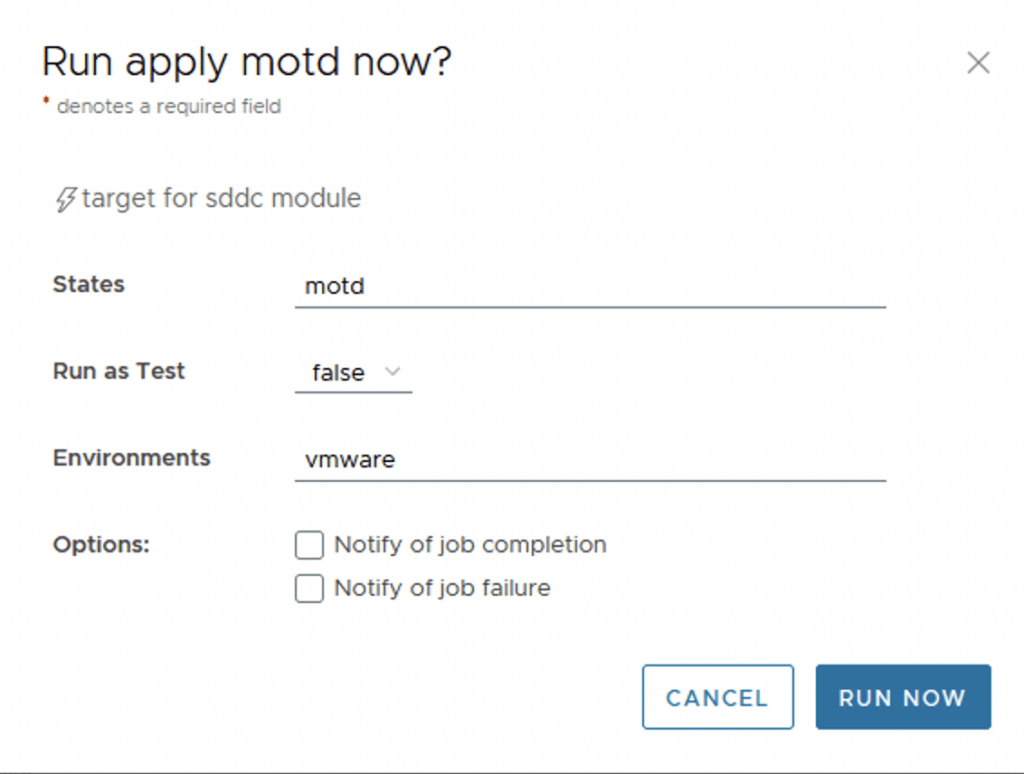
Next I wanted to create a job so it can be around for future use. In the SaltStack Config UI I navigated to Config -> Jobs -> Create job
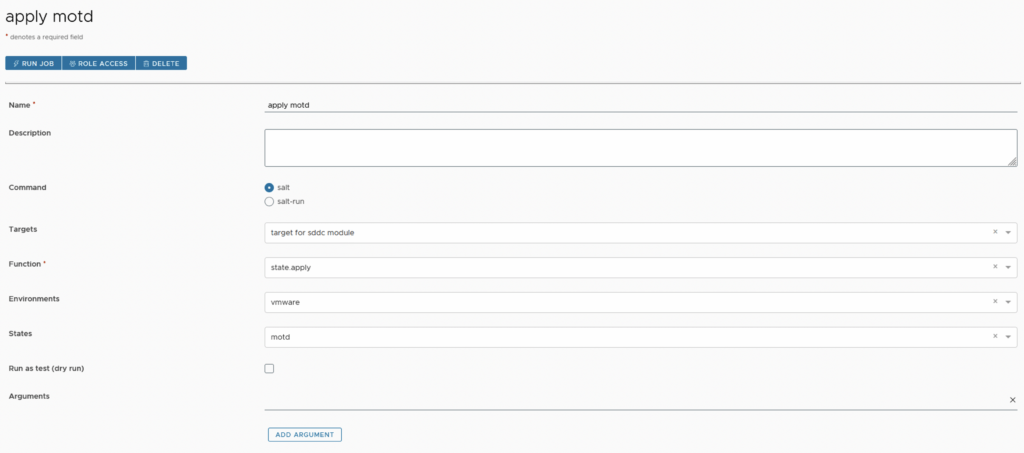
Once I saved the job I was able to go ahead and apply it by running it
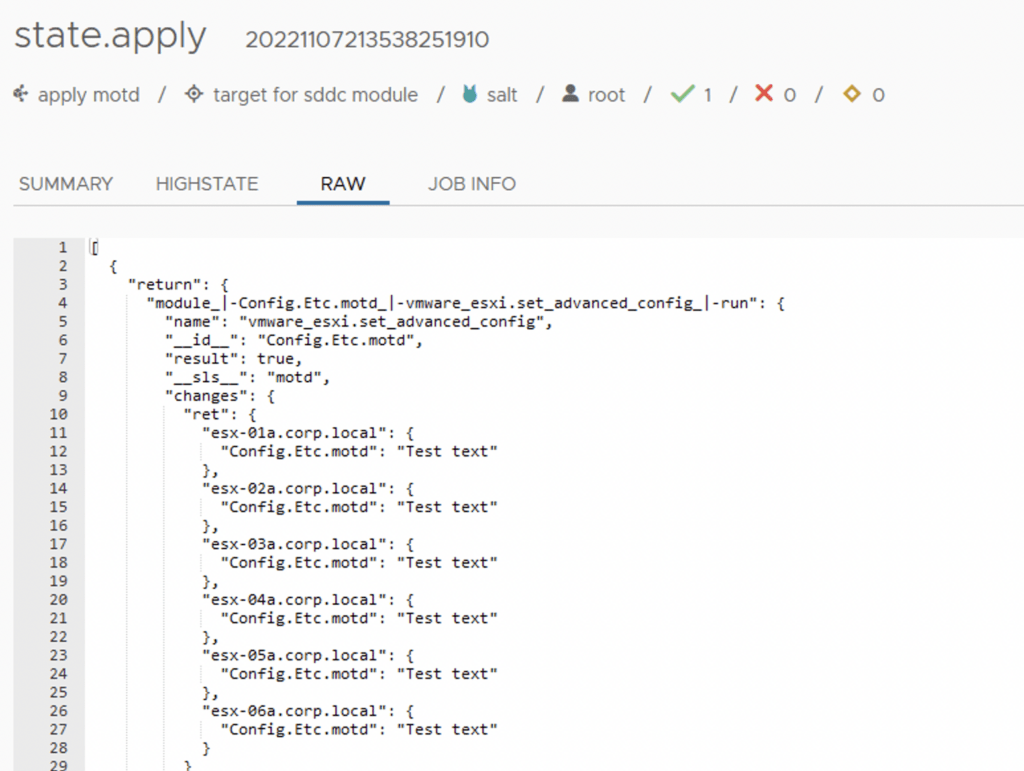
Post completion I was able to verify that my state apply applied the desired configuration across all of my hosts in vCenter
From a vCenter perspective I was also able to double check that the config has actually changed

The additional modules can be found here

The other vSphere modules can be found here

Why Automate Virtual Infrastructure, Why Do it Now, and Why Do it with vRealize Automation

Our IT culture has shifted from managing infrastructure to the management of services. We deliver a self-service catalog to our consumers who manage their environment. Providing our consumers with the self-service catalog reduced delivery of workloads from weeks to hours and it significantly increased their overall satisfaction. – Senior IT director and enterprise architect (Large Healthcare System in western Pennsylvania healthcare system)  

Automation is a journey. The primary reason to adopt automation is to streamline manual processes, enabling your information technology teams to focus on more valuable activities. The goal is to shift lifecycle management of workloads and day-to-day actions to the internal consumer. We look to the future to see where we want to end up and then plan how to get there.  

  • The first decision: your end-state – do you want a self-service or IT as a Service model?  
  • The second decision: which delivery method do you want to use, imperative or declarative code, and do you have the skillset to support the method of choice?  
  • Imperative is IT as a Service. It is programmatically based and relies on your IT coding team.  
  • Declarative can be consumer self-service or IT as a Service.  

Whether you are focused on a private or multi-cloud environment, either method can be employed. But only the declarative approach can deliver self-service capabilities to your internal customers. Here is an example of an organization using the declarative method and its impact.  

Examples:  

  • A well-known children’s hospital in Pennsylvania adopted lifecycle management/process automation.
    • They chose vRealize Automation due to their desire to build out a self-service catalog 
    • Once they deployed vRealize Automation they, they trained their consumers and turned over lifecycle management. 
    • This allowed the Automation Engineers to focus on delivering platform updates and new services for their consumers. 
    • They benefited by avoiding 13,000 helpdesk tickets in their first year by implementing day two actions. 
      • Based on a conservative estimate of a 20-minute resolution per ticket, they avoided 4400 hours of an FTE’s time or 110 weeks (about two years).  
      • Equally as important, this freed up the help desk to focus on level two, and level three issues 
  • Why Do it Now?
    • Why not do it now is the question to be asked? 
  • Information technologies’ role is to provide the infrastructure that supports business-critical applications.  
    • IT cannot be a bottleneck.  
    • The ability to deliver quickly and consistently gives your organization a competitive advantage.  
  • Process automation moves IT from a delivery arm of your business to a support arm. That means:  
    • Self Service: Internal application owners, Database Managers, and DevOps Engineers, lifecycle manage their environments.  
    • Risk Mitigation  
    • Automation of Day-to-Day tasks – You leave room for error when you repeatedly perform a task every day. Invariably it happens. Why is it because we are human, and human beings’ fat finger the keyboard?  
    • Creation of a process that ensures prompt delivery of your customer requests.  
    • Remove backlog of customer requests 
    • Increase internal customer Net Promoter Score (NPS)  
  • Why Do it with vRealize Automation? 
    • vRealize Automation uses the declarative code: build it, and they will come
  • Many organizations utilize commercial off-the-shelf applications.  
    • In this scenario, coders are less relevant.  
    • The declarative method enables IT to build out the relevant use cases for their customer base and make them available in the self-service catalog.  
  • Build use-case templates 
    • Day Zero- deployment of new workloads or services 
    • Day Two – manage the environment.  
    • Day N – retirement  
    • Place all use-cases in a self-service catalog.  
    • Let your Internal consumers consume  
  • The benefits of automating your virtual environment 
    • Deployment of workloads and services is consistent and reliable.  
    • IT or the internal consumer can deliver in hours versus weeks. 
    • IT can monitor compliance and remediate it as needed within minutes vs. hours. 
    • Support teams can recover time and focus on bringing more value to the organization 
    • vRealize Automation deploys and manages across the public, hybrid, and private clouds with the same processes 

Credit goes to Steve Lieberson, Tom Gillaspy and Cosmin Trif. You can find Steve on Twitter and LinkedIn, Tom on Twitter and LinkedIn, and Cosmin on Twitter and LinkedIn

Deploying an AVS cluster on Azure

In this post we will go over the steps for deploying an AVS cluster on Azure.

The first step was to log in to the azure portal at portal.azure.com. Once logged on we can search for “azure vmware solution”

Then I tried to create a cluster by clicking on the Create button on the top left

This opened a wizard for me with the Requirements. Trying to go forward without opening a ticket gave me this error:

Azure VMware Solution is available for all customers with an existing Microsoft Enterprise Agreement or those under a Cloud Solution Provider Azure plan. Prior to creating and deploying your Azure VMware Solution Private Cloud, please review and follow the process for node allocation to your subscription type here.

The instructions send me to the documentation on the steps required and I had to open a ticket to request a quota increase. Here is the direct link to open a ticket

  1. In your Azure portal, under Help + Support, create a New support request and provide the following information:
    • Issue type: Technical
    • Subscription: Select your subscription
    • Service: All services > Azure VMware Solution
    • Resource: General question
    • Summary: Need capacity
    • Problem type: Capacity Management Issues
    • Problem subtype: Customer Request for Additional Host Quota/Capacity
  2. In the Description of the support ticket, on the Details tab, provide information for:
    • Region Name
    • Number of hosts
    • Any other details NoteAzure VMware Solution requires a minimum of three hosts and recommends redundancy of N+1 hosts.
  3. Select Review + Create to submit the request.

It would look like this:

The next screens were pretty self explanatory so I won’t go through them. Once the ticket is created a Microsoft engineer will most likely reach out to verify the details and provision the capacity.

Once the capacity has been provisioned we have a few more steps to follow.

First is to go to subscriptions -> Select Subscription

-> Resource providers -> Search for ads -> Click on register

Before navigating away make sure the Resource shows as registered:

After completing the above going to the Azure VMware Solution allows me to register the go through the screen without errors. Please note that we can only provision resources where they were allocated in the ticket. For example we can’t use resources in West 2 region if the capacity was added to East 2. The ticket from Microsoft would include these details. Sample setup:

The last screen is the review and create. Once we click create the resources will get provisioned.

The deployment will go on for a while. In my case it was 4 hours. Once the deployment is complete we can go to the Azure VMware Solution

After completing the above I would recommend checking out the tutorials on the overview page

SSC 8.8 Authentication failed: no Authorization header

I recently upgraded my LCM deployed SSC server to 8.8.x. If you need a guide to go through the upgrade you can find my other post here.

After the upgrade was completed i was noticing strange behavior in the SSC UI so i checked the status the of the services. Here are the errors i found and how i fixed them

The first step was to check the status of the service

systemctl status salt-master

The return was this

* salt-master.service - The Salt Master Server
   Loaded: loaded (/lib/systemd/system/salt-master.service; enabled; vendor preset: enabled)
   Active: active (running) since Sat 2022-07-16 20:30:29 UTC; 1 day 2h ago
     Docs: man:salt-master(1)
           file:///usr/share/doc/salt/html/contents.html
           https://docs.saltproject.io/en/latest/contents.html
 Main PID: 801 (salt-master)
    Tasks: 40 (limit: 9830)
   Memory: 499.5M
   CGroup: /system.slice/salt-master.service
           |-  801 /bin/python3 /usr/bin/salt-master
           |- 1005 /bin/python3 /usr/bin/salt-master
           |- 1088 /bin/python3 /usr/bin/salt-master
           |- 1090 /bin/python3 /usr/bin/salt-master
           |- 1101 /bin/python3 /usr/bin/salt-master
           |- 1102 /bin/python3 /usr/bin/salt-master
           |- 1110 /bin/python3 /usr/bin/salt-master
           |- 1113 /bin/python3 /usr/bin/salt-master
           |- 1119 /bin/python3 /usr/bin/salt-master
           |- 1120 /bin/python3 /usr/bin/salt-master
           |- 1397 /bin/python3 /usr/bin/salt-master
           |- 1398 /bin/python3 /usr/bin/salt-master
           |- 1400 /bin/python3 /usr/bin/salt-master
           |- 1410 /bin/python3 /usr/bin/salt-master
           |- 1414 /bin/python3 /usr/bin/salt-master
           |- 1419 /bin/python3 /usr/bin/salt-master
           |- 1420 /bin/python3 /usr/bin/salt-master
           |- 1424 /bin/python3 /usr/bin/salt-master
           `-15430 /bin/python3 /usr/bin/salt-master

Jul 17 21:07:47 ssc-01a.corp.local salt-master[801]: [ERROR   ] Failed to authenticate: Authentication failed: no Authorization header
Jul 17 21:07:47 ssc-01a.corp.local salt-master[801]: [ERROR   ] Failed to send minion key state to SSE: 401 Authentication failed: no Authorization header
Jul 17 21:07:48 ssc-01a.corp.local salt-master[801]: [ERROR   ] Failed to authenticate: Authentication failed: no Authorization header
Jul 17 21:07:48 ssc-01a.corp.local salt-master[801]: [ERROR   ] Failed to send minion cache to SSE: 401 Authentication failed: no Authorization header
Jul 17 21:07:48 ssc-01a.corp.local salt-master[801]: [ERROR   ] Failed to authenticate: Authentication failed: no Authorization header
Jul 17 21:07:48 ssc-01a.corp.local salt-master[801]: [ERROR   ] Failed to send master fileserver data to SSE: 401 Authentication failed: no Authorization header
Jul 17 21:07:50 ssc-01a.corp.local salt-master[801]: [ERROR   ] Failed to authenticate: Authentication failed: no Authorization header
Jul 17 21:07:50 ssc-01a.corp.local salt-master[801]: [ERROR   ] sseapi_event_queue: failed to send entries to SSE (will requeue): 401 Authentication failed: no Authorization header
Jul 17 21:07:55 ssc-01a.corp.local salt-master[801]: [ERROR   ] Failed to authenticate: Authentication failed: no Authorization header
Jul 17 21:07:55 ssc-01a.corp.local salt-master[801]: [ERROR   ] sseapi_event_queue: failed to send entries to SSE (will requeue): 401 Authentication failed: no Authorization header

The first step to resolve the error was to delete the master key from the UI by going to SSC UI -> Administration -> Master Keys -> Accepted -> Select the old key and click on delete ex:

Next we need to stop the salt master service by running

systemctl stop salt-master

Additionally on the cli we also need to delete the old key file located at:

/etc/salt/pki/master/sseapi_key.pub

We can delete it by running:

rm /etc/salt/pki/master/sseapi_key.pub

Once the above steps are complete we can get start the services again and accept the new key in the UI.

We can start the service back up by running:

systemctl start salt-master

We can now check the service and add the key back in the UI

systemctl status salt-master

Finally we can restart the saltstack service and verify that its running without errors:

* salt-master.service - The Salt Master Server
   Loaded: loaded (/lib/systemd/system/salt-master.service; enabled; vendor preset: enabled)
   Active: active (running) since Sun 2022-05-15 20:02:56 UTC; 51s ago
     Docs: man:salt-master(1)
           file:///usr/share/doc/salt/html/contents.html
           https://docs.saltproject.io/en/latest/contents.html
 Main PID: 31309 (salt-master)
    Tasks: 39 (limit: 9830)
   Memory: 330.0M
   CGroup: /system.slice/salt-master.service
           |-31309 /bin/python3 /usr/bin/salt-master
           |-31315 /bin/python3 /usr/bin/salt-master
           |-31320 /bin/python3 /usr/bin/salt-master
           |-31323 /bin/python3 /usr/bin/salt-master
           |-31325 /bin/python3 /usr/bin/salt-master
           |-31326 /bin/python3 /usr/bin/salt-master
           |-31327 /bin/python3 /usr/bin/salt-master
           |-31328 /bin/python3 /usr/bin/salt-master
           |-31330 /bin/python3 /usr/bin/salt-master
           |-31397 /bin/python3 /usr/bin/salt-master
           |-31398 /bin/python3 /usr/bin/salt-master
           |-31400 /bin/python3 /usr/bin/salt-master
           |-31411 /bin/python3 /usr/bin/salt-master
           |-31412 /bin/python3 /usr/bin/salt-master
           |-31413 /bin/python3 /usr/bin/salt-master
           |-31414 /bin/python3 /usr/bin/salt-master
           |-31415 /bin/python3 /usr/bin/salt-master
           `-31416 /bin/python3 /usr/bin/salt-master

May 15 20:02:54 ssc-01a.corp.local systemd[1]: Starting The Salt Master Server...
May 15 20:02:56 ssc-01a.corp.local systemd[1]: Started The Salt Master Server.

If the status page a return similar to this

* salt-master.service - The Salt Master Server
   Loaded: loaded (/lib/systemd/system/salt-master.service; enabled; vendor preset: enabled)
   Active: active (running) since Sun 2022-07-17 23:19:35 UTC; 3min 24s ago
     Docs: man:salt-master(1)
           file:///usr/share/doc/salt/html/contents.html
           https://docs.saltproject.io/en/latest/contents.html
 Main PID: 21532 (salt-master)
    Tasks: 40 (limit: 9830)
   Memory: 346.7M
   CGroup: /system.slice/salt-master.service
           |-21532 /bin/python3 /usr/bin/salt-master
           |-21538 /bin/python3 /usr/bin/salt-master
           |-21546 /bin/python3 /usr/bin/salt-master
           |-21550 /bin/python3 /usr/bin/salt-master
           |-21552 /bin/python3 /usr/bin/salt-master
           |-21553 /bin/python3 /usr/bin/salt-master
           |-21554 /bin/python3 /usr/bin/salt-master
           |-21555 /bin/python3 /usr/bin/salt-master
           |-21556 /bin/python3 /usr/bin/salt-master
           |-21557 /bin/python3 /usr/bin/salt-master
           |-21628 /bin/python3 /usr/bin/salt-master
           |-21629 /bin/python3 /usr/bin/salt-master
           |-21631 /bin/python3 /usr/bin/salt-master
           |-21641 /bin/python3 /usr/bin/salt-master
           |-21644 /bin/python3 /usr/bin/salt-master
           |-21645 /bin/python3 /usr/bin/salt-master
           |-21646 /bin/python3 /usr/bin/salt-master
           |-21647 /bin/python3 /usr/bin/salt-master
           `-21648 /bin/python3 /usr/bin/salt-master

Jul 17 23:19:33 ssc-01a.corp.local systemd[1]: Starting The Salt Master Server...
Jul 17 23:19:35 ssc-01a.corp.local systemd[1]: Started The Salt Master Server.

Next we need to go back to the UI and accept the new master key. SSC UI -> Administration -> Master Keys -> Pending Select the new key and click on Accept Key

And with that the issue should be resolved.

Here are a few additional blogs that might be useful post upgrade:

Error Code: LCMVSSC10018

SSC 8.8 sseapi_rpc_queue: could not connect to SSE server

SSC 8.8 urllib3 (1.25.11) or chardet (4.0.0) doesn’t match a supported version

ccp-backups folder missing in NSX-T backup

If you like me tried to to cleanup the backups in NSX-T and ran into error Cleanup script works only in folders, that contains subfolders "cluster-node-backups", "ccp-backups" and "inventory-summary" this post is for you.

I was trying to cleanup the backups before going to the next major release of nsx and i kept getting an error running the nsx_backup_cleaner.py script.

It would seem that the ccp-backups folder has been removed from the backup job so it simply doesn’t exist. VMware did fix the script with the 3.2 release.

If you have anything preventing you from getting to 3.2 here is the updated script

#!/usr/bin/env python
# ***************************************************************************
# Copyright 2020-2021 VMware, Inc.  All rights reserved. VMware Confidential.
# ***************************************************************************
# The purpose of this script is to remove old NSX backup files. Typically, this script
# will be placed on the SFTP server where the NSX Manager is uploading backup files,
# and included into a scheduler, for example cron.  Before running this script, you
# should update the BACKUP_ROOT variable.  This script works on Linux and Windows with
# both Python 2 and Python 3.
#
# On Linux SFTP server:
# You can add this script in the crontab to automatically run this script once daily
# Edit the anacron at /etc/cron.d or use crontab -e and add following line to execute the script at 10am everyday
# 00 10 * * * /sbin/nsx_backup_cleaner.py
#
# On Windows SFTP server:
# schtasks /Create /SC DAILY /TN PythonTask /TR "PATH_TO_PYTHON_EXE PATH_TO_PYTHON_SCRIPT"
# or you can add the same in TaskScheduler


from stat import S_ISREG, ST_ATIME, ST_CTIME, ST_MODE, S_ISDIR, S_IWUSR
import os, sys, time, datetime, shutil, getopt

def delete_files(delete_path_list, count):
    deleted_files = []

    for file in delete_path_list:
        for root, dirs, files in os.walk(file):
            for fname in files:
                full_path = os.path.join(root, fname)
                os.chmod(full_path, S_IWUSR)
        if count > 0:
            deleted_files.append(file)
            if os.path.isdir(file):
                shutil.rmtree(file)
            else:
                os.remove(file)
            count = count - 1
    return deleted_files


def delete_old_backup_enteries(folder, keep_days, min_count):
    keep_files = []
    for elem in os.listdir(folder):
        paths_sorted = []
        entries1 = (os.path.join(folder, elem, fn) for fn in os.listdir(os.path.join(folder, elem)))
        entries2 = ((os.stat(path), path) for path in entries1)
        entries3 = ((stat[ST_CTIME], path) for stat, path in entries2)
        for cdate, path in sorted(entries3):
            paths_sorted.append(path)

        if (len(paths_sorted) <= min_count):
            for file in paths_sorted:
                keep_files.append(file)
            continue

        delete_path_list = []
        for path in paths_sorted:
            file_create_time = os.path.getmtime(path)
            time_now = time.time()
            if ((time_now - file_create_time) > (keep_days * 24 * 60 * 60)):
                delete_path_list.append(path)

        deleted_files = delete_files(delete_path_list, min(len(delete_path_list), len(paths_sorted) - min_count))
        for file in deleted_files:
            paths_sorted.remove(file)

        for file in paths_sorted:
            keep_files.append(file)

    print(("Keeping the following backup files for folder %s" % folder))
    for file in keep_files:
        print(file)

def usage():
    print("""\
    Usage: nsx_backup_cleaner.py -d backup_dir [-k 1] [-l 5] [-h]
           Or
           nsx_backup_cleaner.py --dir backup_dir [--retention-period 1] [--min-count 5] [--help]

           Required
               -d/--dir: Backup root directory
               -k/--retention-period: Number of days need to retain a backup file
           Optional
               -l/--min-count: Minimum number of backup files to be kept, default value is 100
               -h/--help: Display help message
           """)
def main():
    BACKUP_ROOT = None

    BACKUPS_KEEP_DAYS = None
    # Minimum allowed: 100
    BACKUPS_MINCOUNT = 100

    try:
        opts, args = getopt.getopt(sys.argv[1:], "hd:k:l:", ["dir=", "retention-period=", "min-count=", "help"])
    except getopt.GetoptError as err:
    # print help information and exit:
        print ((str(err))) # will print something like "option -a not recognized"
        usage()
        sys.exit()

    for opt, arg in opts:
        if opt in ("-h", "--help"):
            usage()
            sys.exit()
        elif opt in ("-d", "--dir"):
            BACKUP_ROOT = arg
        elif opt in("-k", "--retention-period"):
            BACKUPS_KEEP_DAYS = int(arg)
        elif opt in ("-l", "--min-count"):
            BACKUPS_MINCOUNT = int(arg)
        else:
            usage()
            sys.exit()

    if (BACKUP_ROOT == None):
        print("Missing Backup Root")
        usage()
        sys.exit()

    if (BACKUPS_KEEP_DAYS == None):
        print("Missing Backup Retention Period in number of days")
        usage()
        sys.exit()

    if (not os.path.isdir(BACKUP_ROOT)):
        print("Wrong backup root directory")
        usage()
        sys.exit()

    backup_dirs = os.listdir(BACKUP_ROOT)
    if (all(elem in ["cluster-node-backups", "inventory-summary"] for elem in backup_dirs)):
        for elem in backup_dirs:
            if (elem in ["cluster-node-backups"]):
                delete_old_backup_enteries(os.path.join(BACKUP_ROOT, 'cluster-node-backups'), BACKUPS_KEEP_DAYS, BACKUPS_MINCOUNT)
            if (elem in ["inventory-summary"]):
                delete_old_backup_enteries(os.path.join(BACKUP_ROOT, 'inventory-summary'), BACKUPS_KEEP_DAYS, BACKUPS_MINCOUNT)
    else:
        print ("Cleanup script works only in folders, that contains subfolders \"cluster-node-backups\" and \"inventory-summary\"")


if __name__ == "__main__":
    main()

Additionally for the script to work make sure there are no other folders within the backup folder. the backup folder should only have the cluster-node-backups and inventory-summary directories

SSC 8.8 urllib3 (1.25.11) or chardet (4.0.0) doesn’t match a supported version

I recently upgraded my LCM deployed SSC server to 8.8. If you need a guide to go through the upgrade you can find my other post here.

After the upgrade was completed i was noticing strange behavior in the SSC UI so i checked the status the of the services. Here are the errors i found and how i fixed them

The first step was to check the status of the service

systemctl status salt-master

The return was this

* salt-master.service - The Salt Master Server
   Loaded: loaded (/lib/systemd/system/salt-master.service; enabled; vendor preset: enabled)
   Active: active (running) since Mon 2022-05-16 03:32:35 UTC; 6s ago
     Docs: man:salt-master(1)
           file:///usr/share/doc/salt/html/contents.html
           https://docs.saltproject.io/en/latest/contents.html
 Main PID: 4577 (salt-master)
    Tasks: 39 (limit: 9830)
   Memory: 335.0M
   CGroup: /system.slice/salt-master.service
           |-4577 /bin/python3 /usr/bin/salt-master
           |-4581 /bin/python3 /usr/bin/salt-master
           |-4589 /bin/python3 /usr/bin/salt-master
           |-4593 /bin/python3 /usr/bin/salt-master
           |-4602 /bin/python3 /usr/bin/salt-master
           |-4606 /bin/python3 /usr/bin/salt-master
           |-4608 /bin/python3 /usr/bin/salt-master
           |-4609 /bin/python3 /usr/bin/salt-master
           |-4616 /bin/python3 /usr/bin/salt-master
           |-4697 /bin/python3 /usr/bin/salt-master
           |-4699 /bin/python3 /usr/bin/salt-master
           |-4703 /bin/python3 /usr/bin/salt-master
           |-4711 /bin/python3 /usr/bin/salt-master
           |-4712 /bin/python3 /usr/bin/salt-master
           |-4713 /bin/python3 /usr/bin/salt-master
           |-4714 /bin/python3 /usr/bin/salt-master
           |-4715 /bin/python3 /usr/bin/salt-master
           `-4717 /bin/python3 /usr/bin/salt-master

May 16 03:32:34 ssc-01a.corp.local systemd[1]: Starting The Salt Master Server...
May 16 03:32:35 ssc-01a.corp.local salt-master[4577]: [WARNING ] /usr/lib/python3.7/site-packages/requests/__init__.py:91: RequestsDependencyWarning: urllib3 (1.25.11) or chardet (4.0.0) doesn't match a supported version!
May 16 03:32:35 ssc-01a.corp.local salt-master[4577]:   RequestsDependencyWarning)
May 16 03:32:35 ssc-01a.corp.local systemd[1]: Started The Salt Master Server.

The way i got around the error was by running

pip3 install --upgrade requests

Alternatively the official documentation is here talks about extracting the .whl file from the my vmware customer connect portal here. The file we are looking for is vRA_SaltStack_Config-8.8.0.7-1_Installer.tar.gz

Once Downloaded we are looking for SSEAPE-8.8.0.7-py2.py3-none-any.whl found under sse-installer/salt/sse/eapi_plugin/files

The file needs to be uploaded on the node having the issue and we would run

sudo pip3 install SSEAPE-8.8.0.7-py2.py3-none-any.whl --prefix /usr 

Finally we can restart the saltstack service and verify that its running without errors:

* salt-master.service - The Salt Master Server
   Loaded: loaded (/lib/systemd/system/salt-master.service; enabled; vendor preset: enabled)
   Active: active (running) since Sun 2022-05-15 20:02:56 UTC; 51s ago
     Docs: man:salt-master(1)
           file:///usr/share/doc/salt/html/contents.html
           https://docs.saltproject.io/en/latest/contents.html
 Main PID: 31309 (salt-master)
    Tasks: 39 (limit: 9830)
   Memory: 330.0M
   CGroup: /system.slice/salt-master.service
           |-31309 /bin/python3 /usr/bin/salt-master
           |-31315 /bin/python3 /usr/bin/salt-master
           |-31320 /bin/python3 /usr/bin/salt-master
           |-31323 /bin/python3 /usr/bin/salt-master
           |-31325 /bin/python3 /usr/bin/salt-master
           |-31326 /bin/python3 /usr/bin/salt-master
           |-31327 /bin/python3 /usr/bin/salt-master
           |-31328 /bin/python3 /usr/bin/salt-master
           |-31330 /bin/python3 /usr/bin/salt-master
           |-31397 /bin/python3 /usr/bin/salt-master
           |-31398 /bin/python3 /usr/bin/salt-master
           |-31400 /bin/python3 /usr/bin/salt-master
           |-31411 /bin/python3 /usr/bin/salt-master
           |-31412 /bin/python3 /usr/bin/salt-master
           |-31413 /bin/python3 /usr/bin/salt-master
           |-31414 /bin/python3 /usr/bin/salt-master
           |-31415 /bin/python3 /usr/bin/salt-master
           `-31416 /bin/python3 /usr/bin/salt-master

May 15 20:02:54 ssc-01a.corp.local systemd[1]: Starting The Salt Master Server...
May 15 20:02:56 ssc-01a.corp.local systemd[1]: Started The Salt Master Server.

If the status page a return similar to this

sseapi_rpc_queue: could not connect to SSE server

Follow my other guide here

SSC 8.8 sseapi_rpc_queue: could not connect to SSE server

I recently upgraded my LCM deployed SSC server to 8.8. If you need a guide to go through the upgrade you can find my other post here.

After the upgrade was completed i was noticing strange behavior in the SSC UI so i checked the status the of the services. Here are the errors i found and how i fixed them

The first step was to check the status of the service

systemctl status salt-master

The return was this

root@ssc-01a [ ~ ]# systemctl status salt-master
* salt-master.service - The Salt Master Server
   Loaded: loaded (/lib/systemd/system/salt-master.service; enabled; vendor preset: enabled)
   Active: active (running) since Sun 2022-05-15 16:39:26 UTC; 8min ago
     Docs: man:salt-master(1)
           file:///usr/share/doc/salt/html/contents.html
           https://docs.saltproject.io/en/latest/contents.html
 Main PID: 3035 (salt-master)
    Tasks: 39 (limit: 9830)
   Memory: 357.0M
   CGroup: /system.slice/salt-master.service
           |-3035 /bin/python3 /usr/bin/salt-master
           |-3041 /bin/python3 /usr/bin/salt-master
           |-3110 /bin/python3 /usr/bin/salt-master
           |-3115 /bin/python3 /usr/bin/salt-master
           |-3119 /bin/python3 /usr/bin/salt-master
           |-3122 /bin/python3 /usr/bin/salt-master
           |-3123 /bin/python3 /usr/bin/salt-master
           |-3124 /bin/python3 /usr/bin/salt-master
           |-3125 /bin/python3 /usr/bin/salt-master
           |-3203 /bin/python3 /usr/bin/salt-master
           |-3204 /bin/python3 /usr/bin/salt-master
           |-3206 /bin/python3 /usr/bin/salt-master
           |-3214 /bin/python3 /usr/bin/salt-master
           |-3216 /bin/python3 /usr/bin/salt-master
           |-3219 /bin/python3 /usr/bin/salt-master
           |-3220 /bin/python3 /usr/bin/salt-master
           |-3221 /bin/python3 /usr/bin/salt-master
           `-4871 /bin/python3 /usr/bin/salt-master

May 15 16:39:26 ssc-01a.corp.local systemd[1]: Started The Salt Master Server.
May 15 16:39:27 ssc-01a.corp.local salt-master[3035]: [ERROR   ] sseapi_rpc_queue: could not connect to SSE server: [Errno 111] Connection refused
May 15 16:39:27 ssc-01a.corp.local salt-master[3035]: [ERROR   ] sseapi_event_queue: could not connect to SSE server: [Errno 111] Connection refused
May 15 16:39:27 ssc-01a.corp.local salt-master[3035]: [ERROR   ] Failed to get the salt environments: [Errno 111] Connection refused
May 15 16:39:28 ssc-01a.corp.local salt-master[3035]: [ERROR   ] Failed to retrieve commands from SSE: [Errno 111] Connection refused
May 15 16:39:32 ssc-01a.corp.local salt-master[3035]: [ERROR   ] sseapi_rpc_queue: could not connect to SSE server: [Errno 111] Connection refused
May 15 16:39:32 ssc-01a.corp.local salt-master[3035]: [ERROR   ] sseapi_event_queue: could not connect to SSE server: [Errno 111] Connection refused
May 15 16:39:37 ssc-01a.corp.local salt-master[3035]: [ERROR   ] sseapi_rpc_queue: could not connect to SSE server: [Errno 111] Connection refused
May 15 16:39:38 ssc-01a.corp.local salt-master[3035]: [ERROR   ] Failed to retrieve commands from SSE: [Errno 111] Connection refused
May 15 16:39:38 ssc-01a.corp.local salt-master[3035]: [ERROR   ] sseapi_event_queue: could not connect to SSE server: [Errno 111] Connection refused

The way i got around the error was by editing the /etc/salt/master.d/raas.conf. The file seems to be missing a key auth parameter. The engines section should look like this

engines:
  - sseapi: {}
  - eventqueue: {}
  - rpcqueue: {}
  - jobcompletion: {}
  - keyauth: {}

After restarting the salt master i was able to verify that the error was gone. To restart the service i ran

systemctl restart salt-master

To verify the status i ran

systemctl restart salt-master
* salt-master.service - The Salt Master Server
   Loaded: loaded (/lib/systemd/system/salt-master.service; enabled; vendor preset: enabled)
   Active: active (running) since Sun 2022-05-15 20:02:56 UTC; 51s ago
     Docs: man:salt-master(1)
           file:///usr/share/doc/salt/html/contents.html
           https://docs.saltproject.io/en/latest/contents.html
 Main PID: 31309 (salt-master)
    Tasks: 39 (limit: 9830)
   Memory: 330.0M
   CGroup: /system.slice/salt-master.service
           |-31309 /bin/python3 /usr/bin/salt-master
           |-31315 /bin/python3 /usr/bin/salt-master
           |-31320 /bin/python3 /usr/bin/salt-master
           |-31323 /bin/python3 /usr/bin/salt-master
           |-31325 /bin/python3 /usr/bin/salt-master
           |-31326 /bin/python3 /usr/bin/salt-master
           |-31327 /bin/python3 /usr/bin/salt-master
           |-31328 /bin/python3 /usr/bin/salt-master
           |-31330 /bin/python3 /usr/bin/salt-master
           |-31397 /bin/python3 /usr/bin/salt-master
           |-31398 /bin/python3 /usr/bin/salt-master
           |-31400 /bin/python3 /usr/bin/salt-master
           |-31411 /bin/python3 /usr/bin/salt-master
           |-31412 /bin/python3 /usr/bin/salt-master
           |-31413 /bin/python3 /usr/bin/salt-master
           |-31414 /bin/python3 /usr/bin/salt-master
           |-31415 /bin/python3 /usr/bin/salt-master
           `-31416 /bin/python3 /usr/bin/salt-master

May 15 20:02:54 ssc-01a.corp.local systemd[1]: Starting The Salt Master Server...
May 15 20:02:56 ssc-01a.corp.local systemd[1]: Started The Salt Master Server.

VMware documentation also talks about the procedure above in the Upgrade the Master Plugin documentation found here

If the status page a return similar to this

 [py.warnings      :110 ][WARNING ][5488] /usr/lib/python3.7/site-packages/requests/__init__.py:91: RequestsDependencyWarning: urllib3 (1.25.11) or chardet (4.0.0) doesn't match a supported version!
  RequestsDependencyWarning)

Follow my other guide here

vRSLCM 8.x change admin@local password via API

I recently had an use case where i wanted to change the admin@local LCM password via an API call in order to automate the password rotation.

If you need a guide to get started you can find my other blog here

To change the password we can use postman PUT call to https://$vRLCM/lcm/authzn/api/v2/users/password

Don`t forget to include the new password under the body field formatted in JSON format ex:

We can also leverage curl using:

curl -k --location --request PUT 'https://$vRSLCM/lcm/authzn/api/v2/users/password' \
--header 'Accept: application/json' \
--header 'Content-Type: application/json' \
--header 'Authorization: Basic Token' \
--data-raw '{
  "password": "new_password",
  "username": "admin@local"
}'

Don`t forget to replace the token with a properly encoded base64 token. Instructions are found on my other blog here

vRSLCM 8 API getting started

I`ve been having a hard time finding one article that covers the vRSLCM (vRealize Suite Lifecycle Manager) API. The official documentation can be found here

As we can see we can leverage the swagger UI by going to https://$vRLCM/api/swagger-ui.html but… i wanted to leverage curl from the cli or postman and as per best practices i wanted to generate a Bearer token.

First step was to authenticate using the credentials. We can do so in Postman by completing the Authorization fields using basic auth and running an POST against https://$vRLCM/lcm/authzn/api/login Example:

If we want to run it via curl we need to generate the credentials via a base64 encoded format. Luckily there is an easy converter at https://www.base64encode.org/ The format should be username:password. Ex:

Now that we have the encoded version we can leverage a simple curl command. In my case i also added a -k at the end to ignore the invalid SSL certificate

curl --location --request POST 'https://$vRLCM/lcm/authzn/api/login' \
--header 'Authorization: Basic YWRtaW5AbG9jYWw6cGFzc3dvcmQ=' -k

If correct the command will return a simple Login succeessfully message.

Now we can use the Authorization to query different things like checking the health. Looking at the swagger UI we can see that we require a get to /lcm/health/api/vs2/status

Example in Postman:

or via curl:

curl -X GET "https://$vRLCM/lcm/health/api/v2/status" -H  "accept: application/json"  --header 'Authorization: Basic YWRtaW5AbG9jYWw6cGFzc3dvcmQ=' -k

Installing an vROPS management pack via vRSLCM

This post we will be going over installing an vROPS management pack via vRSLCM. (If you haven’t added your My VMware credentials you will need to do that first by going to vRealize Lifecycle Manager -> Lifecycle Operations -> Settings -> My VMware)

Once logged on to vRSLCM click on the marketplace.

Alternatively we can also navigate to the marketplace by navigating to it via the side menu

In my case i want to install SDDC Health Monitoring Solution. Searching for sddc in the search box gives a number of results. In my case the latest version is 8.6.1

We can click directly on download or we can click on view details to show what the management pack provides

Once clicking on download we are presented with the EULA Agreement. Once reviewed we can click on next so we can enter some user information.

We can completed the required fields marked with an red asterisk and click on download to download the package.

Since the download was very small it completed relatively quickly in my environment. If we want to see the progress of the download we can navigate to Lifecycle Operations -> Requests. Once completed we can come back to the marketplace and we are presented with an install button. Click on install

Select which environment and datacenter we want to install the management pack in and lick on install.

We can view the progress by clicking on check request status on the bottom of the page

Once the installation reports as completed we can go to vROPS and verify that it was successfully installed

Navigating to the vROPS repository we can see that the management pack was successfully installed as well as configured