Browse Category

Uncategorized

Stopping a Running Task in SDDC Manager: A Step-by-Step Guide

In the world of VMware’s Cloud Foundation, the SDDC Manager plays a pivotal role in streamlining and automating the deployment, management, and orchestration of the software-defined data center components. However, administrators occasionally face the need to halt an ongoing task for various reasons, such as incorrect parameters or prioritizing other operations. This blog post provides a detailed walkthrough on how to gracefully stop a running task in SDDC Manager, ensuring minimal impact on the environment and maintaining system integrity.

Understanding the SDDC Manager’s Task Framework

Before diving into the procedure, it’s important to grasp how SDDC Manager handles tasks. Tasks in SDDC Manager represent operations such as deploying a new workload domain, adding a cluster, or updating software components. Each task is associated with a unique ID and comprises one or more subtasks, reflecting the task’s complexity and multi-step nature.

Identifying the Task to be Stopped

First, you need to identify the task you wish to stop. This can be done via the SDDC Manager UI or API. In the UI, navigate to the ‘Tasks’ tab where you can view ongoing, completed, and scheduled tasks along with their IDs. If you’re using the API, you can list the current tasks by querying the /tasks endpoint.

Gracefully Stopping the Task

After identifying the task, the next step is to stop it gracefully. This involves two critical considerations:

  1. Determine if the Task Can Be Stopped: Not all tasks can be safely interrupted. Check the documentation or use the API to query the task’s state and understand if it’s in a state that can be safely stopped.
  2. Use the SDDC Manager API to Stop the Task: SDDC Manager doesn’t provide a direct ‘Stop Task’ button in the UI for all tasks. Instead, use the API to send a stop command. This usually involves sending a PUT request to the /tasks/{taskId}/cancel endpoint, where {taskId} is the ID of the task you wish to stop.
  3. Option 2 Use the CLI:
curl -X DELETE http://localhost/tasks/registrations/{taskId}

Monitoring and Verification

After issuing the stop command, monitor the task’s status through the UI or API to ensure it transitions to a ‘Stopped’ or ‘Cancelled’ state. It’s crucial to verify the partial execution of the task hasn’t left the system in an inconsistent state. Depending on the task, you may need to revert certain operations or manually complete the task’s intended actions.

Conclusion

Halting a running task in SDDC Manager is a powerful capability, but it comes with the responsibility of ensuring system integrity and consistency. Always assess the impact and necessity of stopping a task before proceeding.

Remember, in the realm of VMware and SDDC Manager, thorough understanding and careful operation are key to maintaining a robust, efficient, and agile data center infrastructure.


This guide aims to arm VMware professionals with the knowledge to manage their SDDC environments more effectively. However, as every environment is unique, it’s important to adapt these guidelines to fit your specific situation and consult VMware documentation for the latest features and best practices.
Navigating Alerts, Symptoms, and Notifications in VMware Aria Operations

In the realm of IT infrastructure management, staying ahead of potential issues and ensuring optimal performance are paramount. VMware Aria Operations, formerly known as vRealize Operations (vROps), provides a comprehensive solution for monitoring, troubleshooting, and optimizing virtual environments. A critical feature of Aria Operations is its alerting system, which uses symptoms to detect issues and then notifies administrators through various channels. This blog explores the intricacies of alerts, symptoms, and notifications within VMware Aria Operations, offering a guide to effectively utilizing these features for maintaining a healthy IT environment.

Understanding Alerts in VMware Aria Operations

Alerts in Aria Operations serve as the first line of defense against potential issues within your virtual environment. They are generated based on specific conditions or thresholds being met, which are identified through symptoms. An alert can signify anything from performance degradation, capacity issues, to compliance violations, providing administrators with the immediate knowledge that action is required.

The Anatomy of an Alert

An alert in Aria Operations consists of several components:

  • Trigger: The specific event or metric threshold that initiates the alert.
  • Severity: Indicates the urgency of the alert, ranging from informational to critical.
  • Symptoms: The conditions that lead to the generation of the alert.
  • Recommendations: Suggested actions or remediations to resolve the underlying issue.

Symptoms: The Building Blocks of Alerts

Symptoms are the conditions that Aria Operations monitors to detect issues within the virtual environment. They can be based on metrics (such as CPU or memory usage), log entries, or events, and are defined by thresholds that, when breached, indicate a potential problem.

Creating Custom Symptoms

While Aria Operations comes with a vast array of predefined symptoms, the platform also allows for the creation of custom symptoms. This flexibility enables administrators to tailor monitoring to the unique needs of their environment, ensuring that they are alerted to the issues most pertinent to their infrastructure.

Notifications: Keeping You Informed

Once an alert is triggered, it’s crucial that the right people are informed promptly so they can take action. Aria Operations facilitates this through its notification system, which can deliver messages via email, SNMP traps, or webhooks to other systems for further processing or alerting.

Configuring Notifications

Setting up notifications in Aria Operations involves defining notification policies that specify:

  • Who gets notified: Determine the recipients of the alert notifications.
  • How they are notified: Choose the delivery method (email, SNMP trap, webhook).
  • What triggers the notification: Associate the notification policy with specific alerts or alert categories.

This granular control ensures that notifications are both relevant and timely, reducing noise and focusing attention on resolving critical issues.

Putting It All Together

Implementing an effective alerting strategy with VMware Aria Operations involves:

  1. Identifying key metrics and conditions that are critical to your environment’s health and performance.
  2. Creating and refining symptoms to accurately detect these conditions.
  3. Configuring alerts to trigger based on these symptoms, setting appropriate severity levels and recommendations.
  4. Establishing notification policies to ensure the right stakeholders are informed at the right time.

Conclusion

Alerts, symptoms, and notifications form the core of proactive infrastructure management in VMware Aria Operations. By leveraging these features, IT administrators can ensure they are always ahead of potential issues, maintaining optimal performance and availability of their virtual environments. As every environment is unique, taking the time to customize and fine-tune these settings is key to unlocking the full potential of Aria Operations for your organization.

Upgrading Aria Operations for Logs to 8.14.1 via VMware Aria Suite Lifecycle

In this post i will go over upgrading my 8.x vRLI appliance to Aria Operations for Logs 8.14.1 using VMware Aria Suite Lifecycle. As a pre requirement we do need to have VMware Aria Suite Lifecycle upgraded to 8.14. Instructions can be found here. The upgrade does not include the latest PSPACK that contains the 8.14.1 Aria Automation Config release. Instructions to get the PSPACK can be found on my other blog post here.

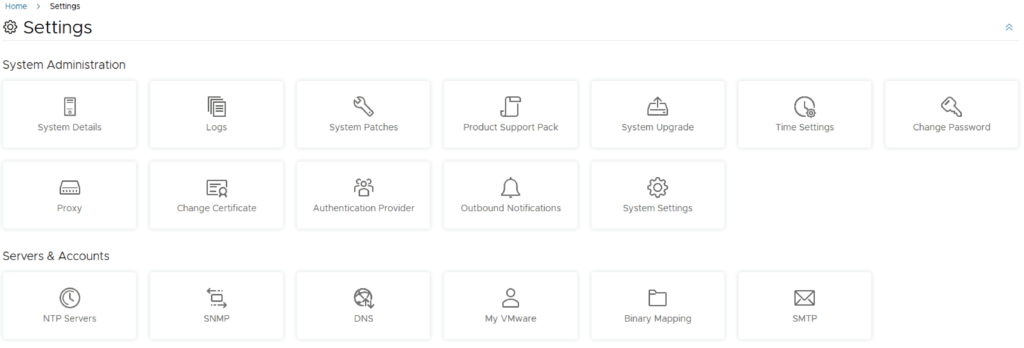
To get started we can go to VMware Aria Suite Lifecycle -> Lifecycle Operations -> Settings -> Binary Mapping. (If you haven’t added your My VMware credentials you will need to do that first by going to vRealize Lifecycle Manager -> Lifecycle Operations -> Settings -> My VMware)

Click on Add Binaries under Product Binaries

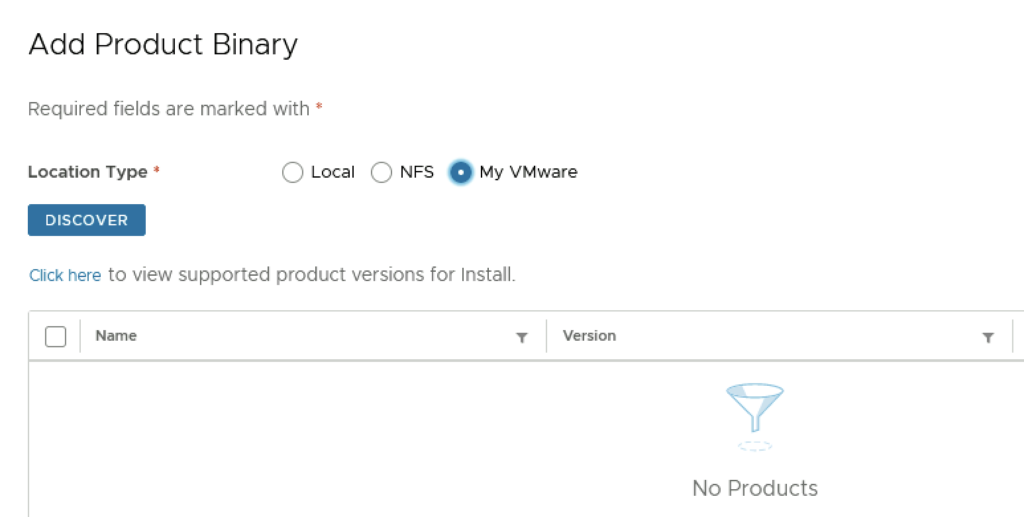
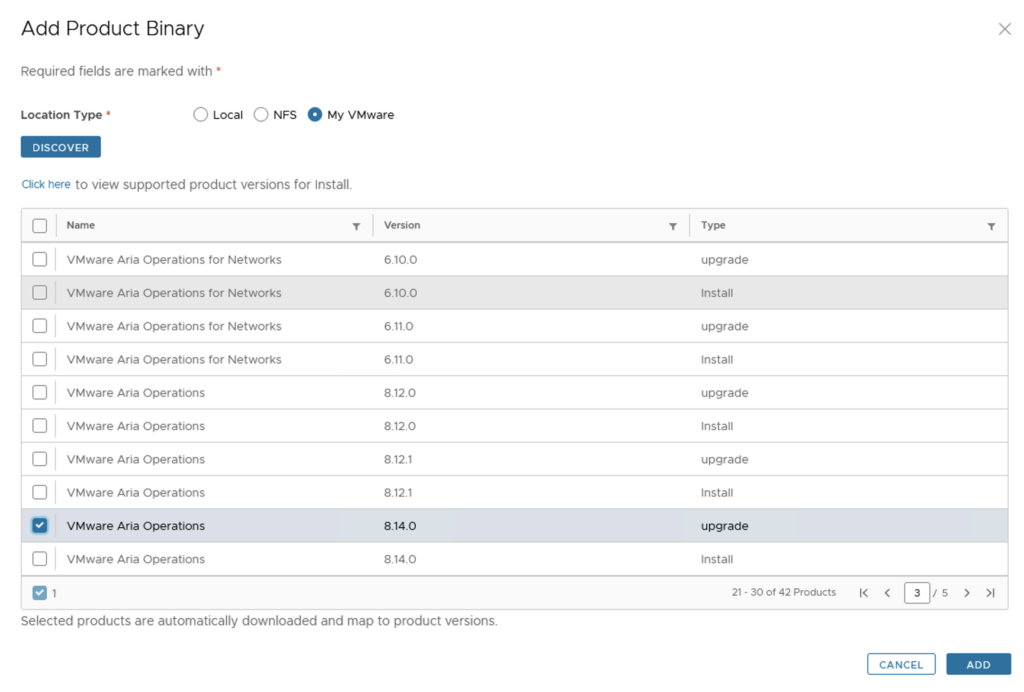
Select My VMware and click on Discover

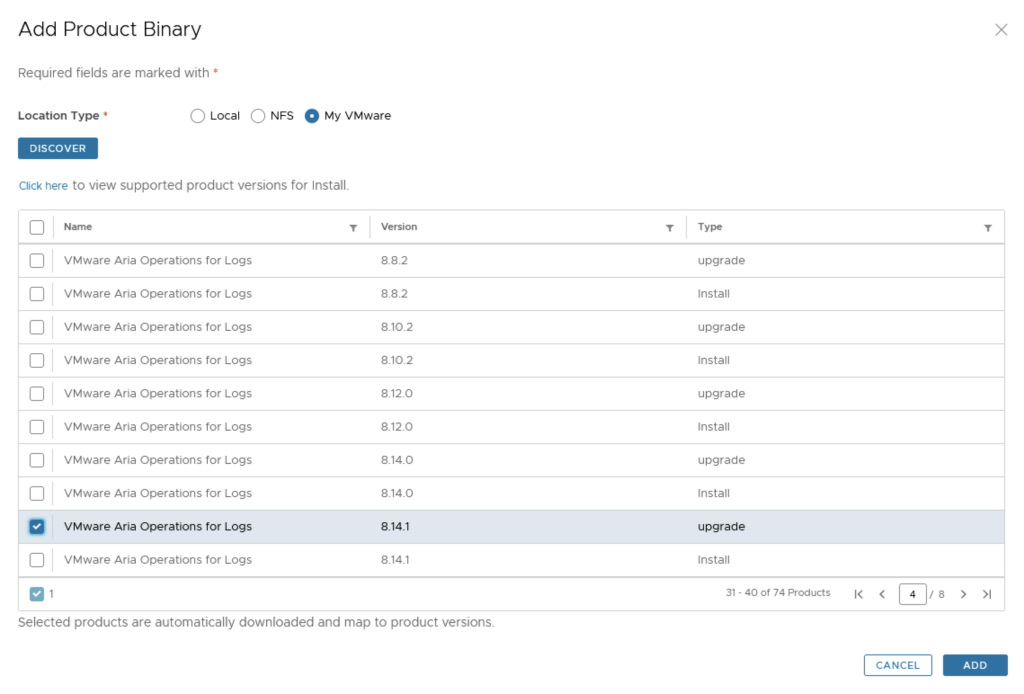
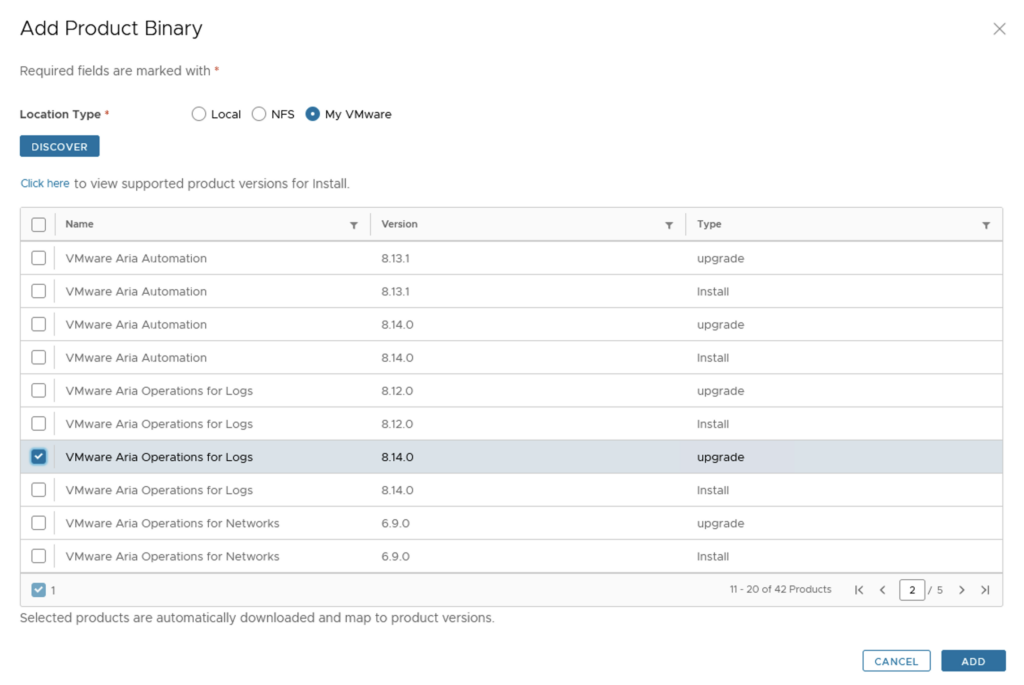
We can see a list of binaries that have been discovered. Make sure we select the upgrade package not the install package. We can select what we need and click on Add

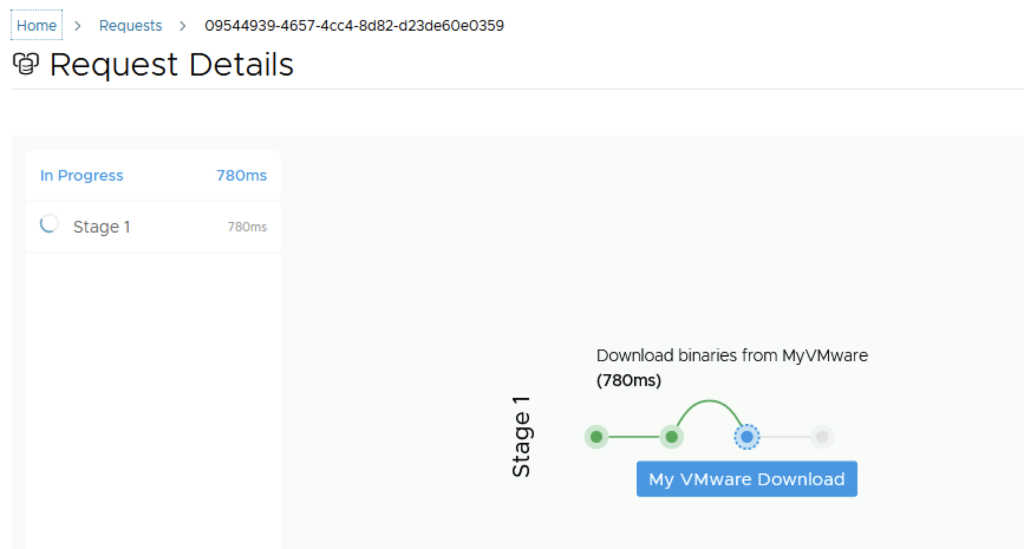
This will create a request and start downloading the package. To view the progress we can click on the Click Here hyperlink

Click on the in Progress button to view the details

We now have to wait for the download to complete

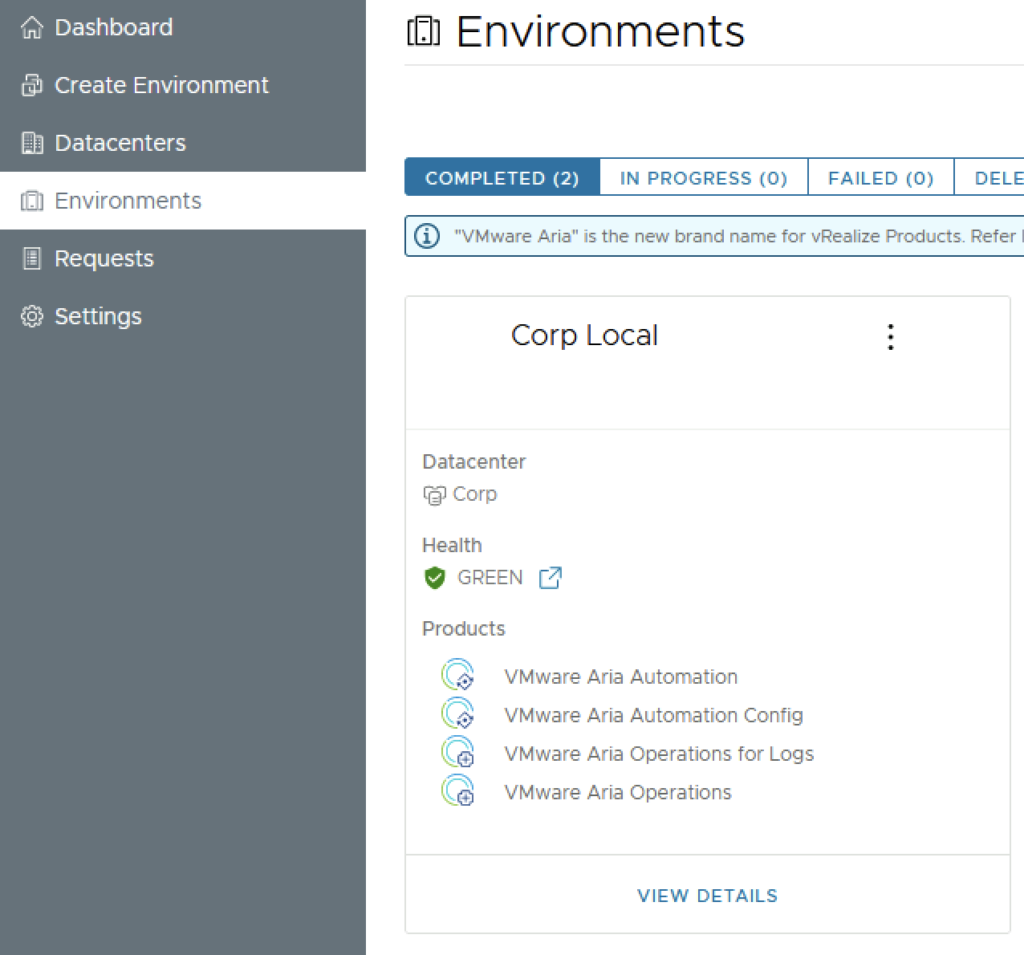
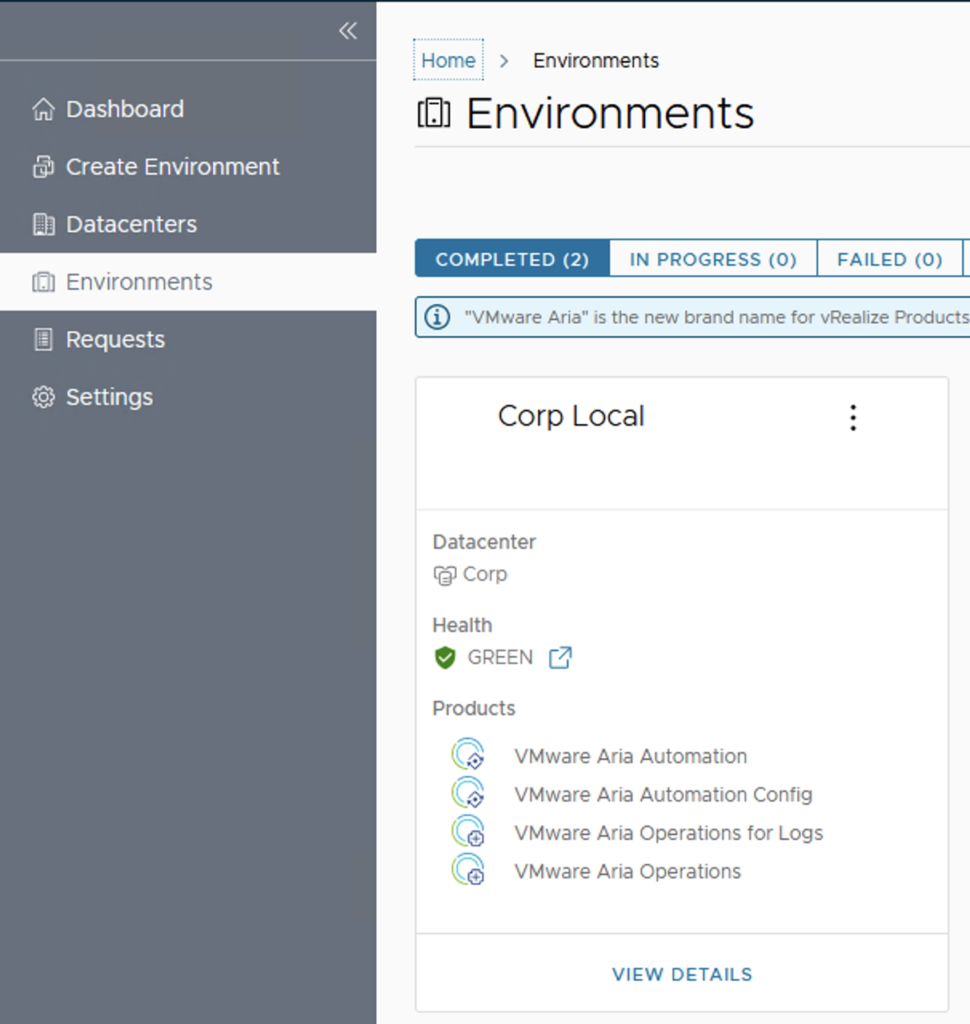
After the download is complete we can go to Environments -> View Details on the environment that includes Logs

Click on Upgrade

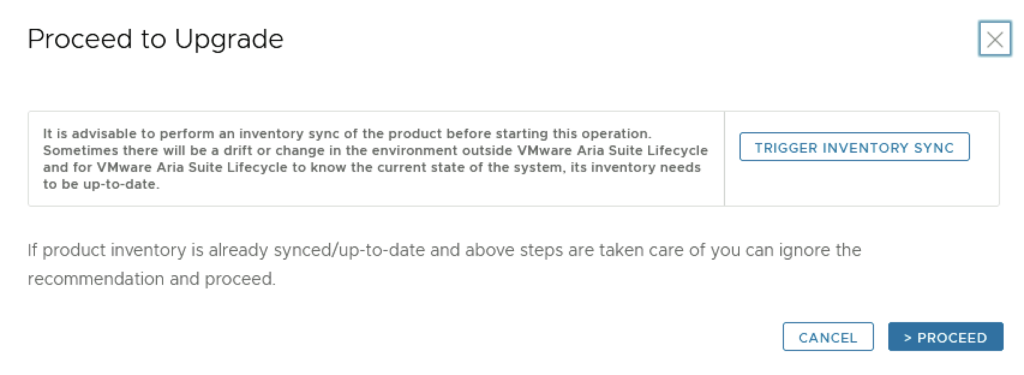
An Inventory sync is recommended if the environment has changed since LCM performed the last sync. We trigger the sync from the UI or click on Proceed to continue

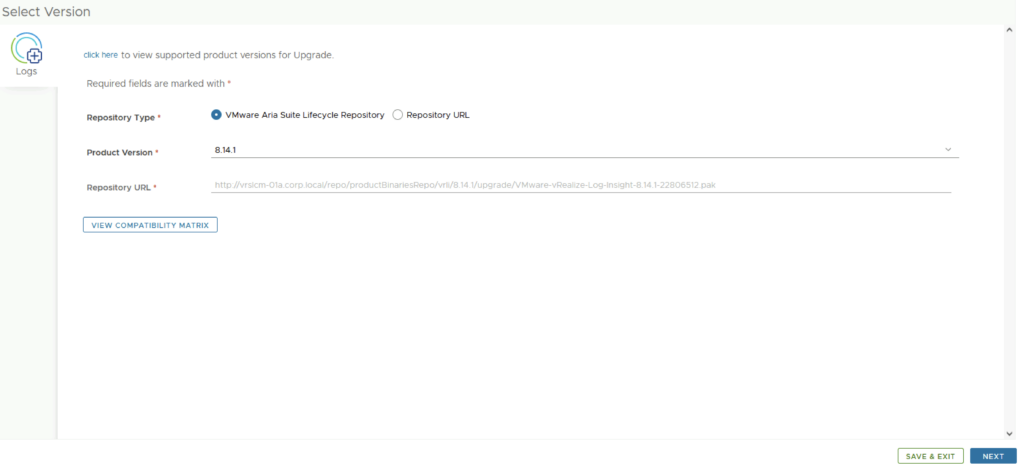
Select product Version 8.14.1 and click Next. We can also review the compatibility matrix to make sure the environment is compatible.

A new feature that was added was the capability to automatically create a snapshot prior to the upgrade and remove it after the upgrade. On this screen we also have the ability to chose if we want to keep the snapshots post upgrade for validation testing for example. Click next

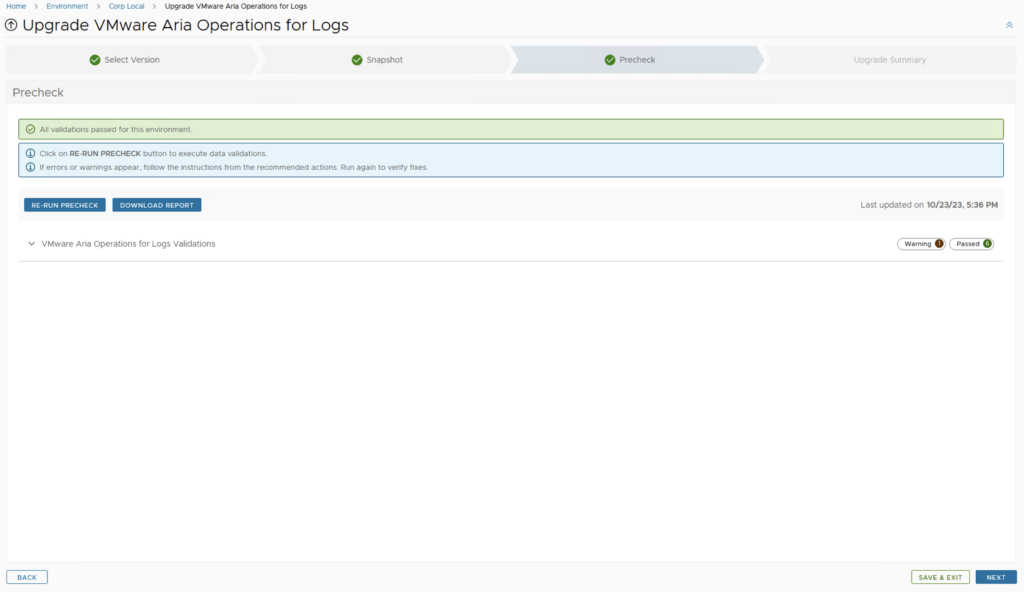
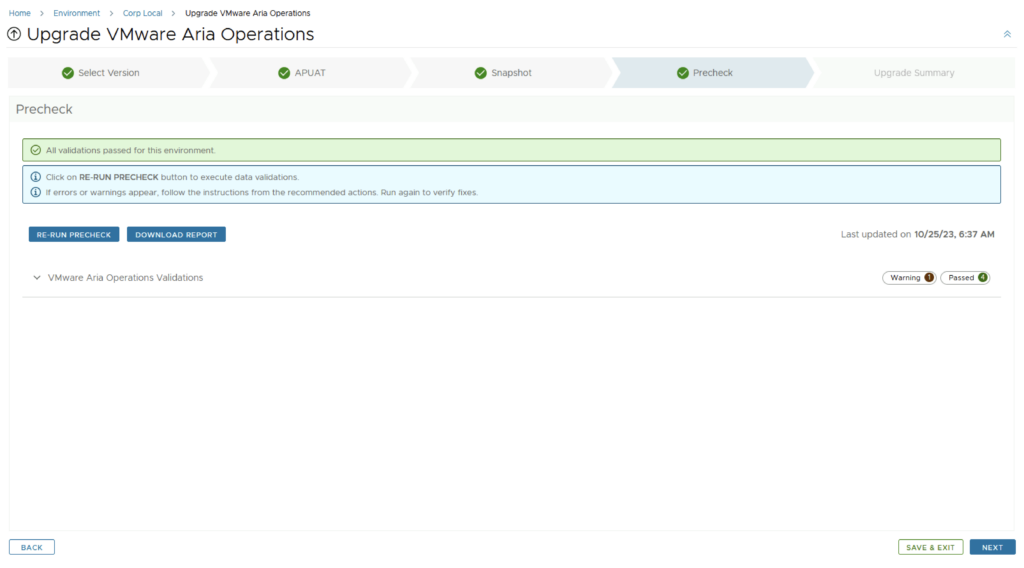
Run the Precheck to make sure there are no errors or issues.

Once the check is complete we can review the checks that were performed and we can continue by clicking Next.

Review the upgrade details and click on Next then Finish. We are taken to the progress screen where we can follow the progress.

The system will get rebooted and once its back up we will be on 8.14.1

Since we are doing a major upgrade i strongly recommend to clean the cache before using the new Aria Operations for Logs version.

Upgrading VMware Aria Operations to 8.14 via VMware Aria Suite Lifecycle

In this post i will go over upgrading my 8.x vROPS appliance to 8.14 using VMware Aria Suite Lifecycle. As a pre requirement we do need to have vRSLCM (vRealize Lifecycle Manager) upgraded to 8.14 Instructions can be found here. The upgrade already includes the latest Product Support Pack so an update to the Product Support Pack is not required.

To get started we can go to VMware Aria Suite Lifecycle -> Lifecycle Operations -> Settings -> Binary Mapping. (If you haven’t added your My VMware credentials you will need to do that first by going to VMware Aria Suite Lifecycle -> Lifecycle Operations -> Settings -> My VMware)

Click on Add Binaries under Product Binaries

Select My VMware and click on Discover

We can see a list of binaries that have been discovered. Make sure we select the upgrade package not the install package. We can select what we need and click on Add

This will create a request and start downloading the package. To view the progress we can click on the Click Here hyperlink

Click on the in Progress button to view the details

We now have to wait for the download to complete

After the download is complete we can go to Environments -> View Details on the environment that includes VMware Aria Operations

Click on Upgrade

An Inventory sync is recommended if the environment has changed since LCM performed the last sync. We trigger the sync from the UI or click on Proceed to continue

Select product Version 8.14 and click Next. We can also review the compatibility matrix to make sure the environment is compatible.

Run the Upgrade Assessment tool to make sure the currently used dashboards, reports, metrics etc are still compatible with the new version

Once the report has finished running we can either Download or view the report. Once everything has been reviewing we can click on the I have viewed the report and agree to proceed box and click next to proceed to the next step.

A new feature that was added was the capability to automatically create a snapshot prior to the upgrade and remove it after the upgrade. On this screen we also have the ability to chose if we want to keep the snapshots post upgrade for validation testing for example. Click next

Run the Precheck to make sure there are no errors or issues.

Once the check is complete we can review the checks that were performed and we can continue by clicking Next.

Review the upgrade details and click on Next and the Submit. We are taken to the progress screen where we can follow the progress.

The system will get rebooted and once its back up we will be on 8.14

Since we are doing a major upgrade i strongly recommend to clean the cache before using the new VMware Aria Operations environment.

Upgrading Aria Operations for Logs to 8.14 via VMware Aria Suite Lifecycle

In this post i will go over upgrading my 8.x vRLI appliance to Aria Operations for Logs 8.14 using VMware Aria Suite Lifecycle. As a pre requirement we do need to have VMware Aria Suite Lifecycle upgraded to 8.14. Instructions can be found here. The upgrade already includes the latest Product Support Pack so an update to the Product Support Pack is not required.

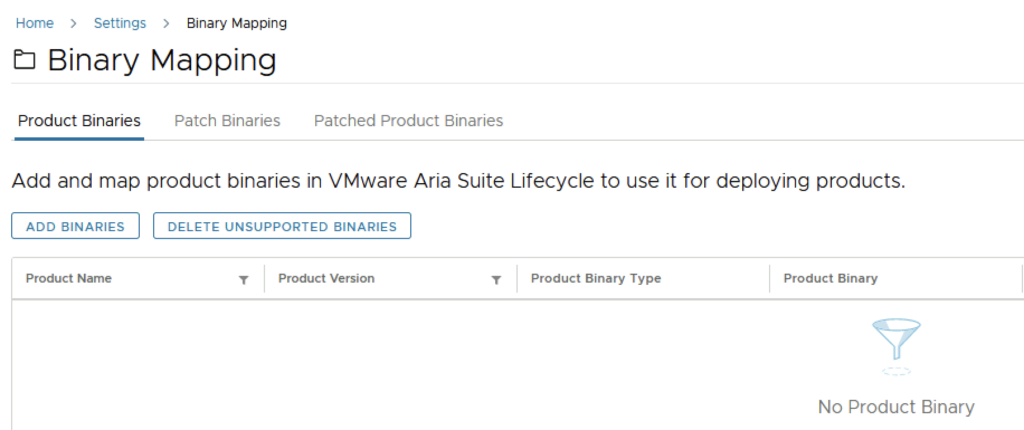
To get started we can go to VMware Aria Suite Lifecycle -> Lifecycle Operations -> Settings -> Binary Mapping. (If you haven’t added your My VMware credentials you will need to do that first by going to vRealize Lifecycle Manager -> Lifecycle Operations -> Settings -> My VMware)

Click on Add Binaries under Product Binaries

Select My VMware and click on Discover

We can see a list of binaries that have been discovered. Make sure we select the upgrade package not the install package. We can select what we need and click on Add

This will create a request and start downloading the package. To view the progress we can click on the Click Here hyperlink

Click on the in Progress button to view the details

We now have to wait for the download to complete

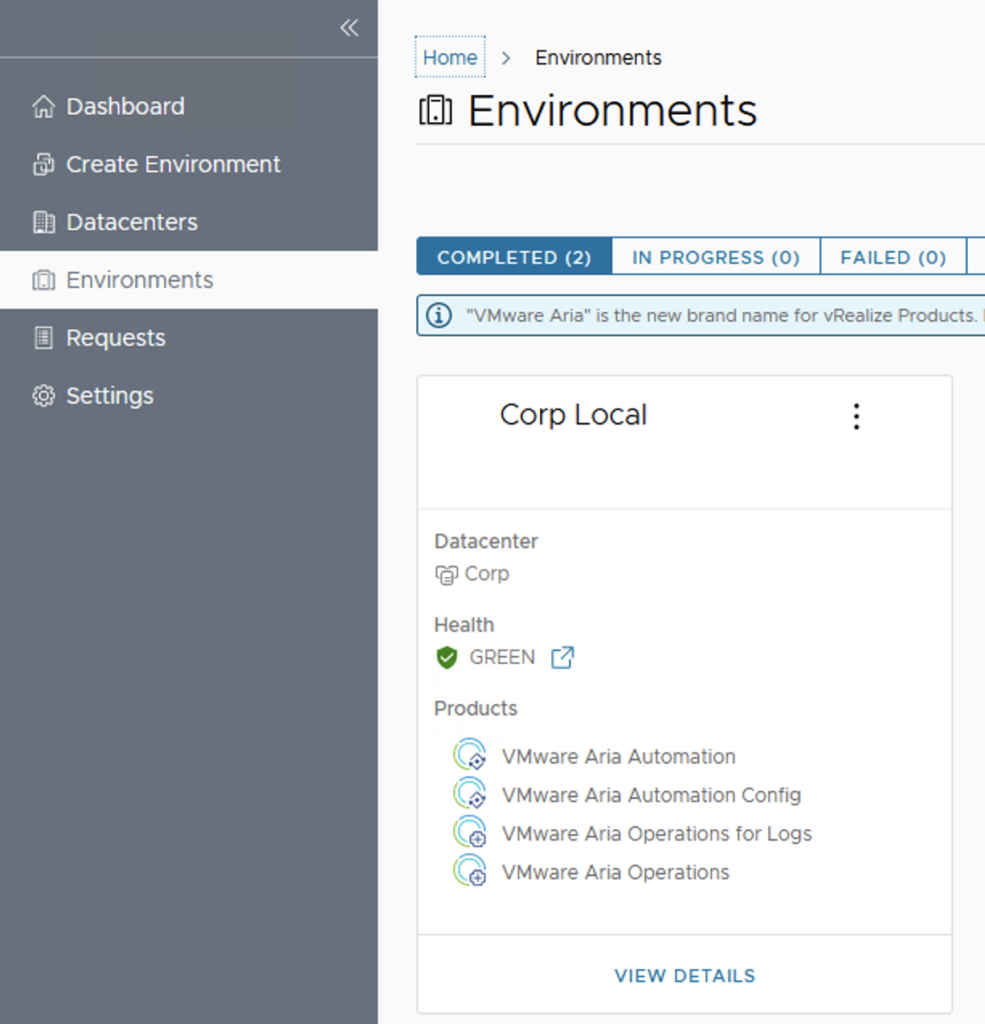
After the download is complete we can go to Environments -> View Details on the environment that includes Logs

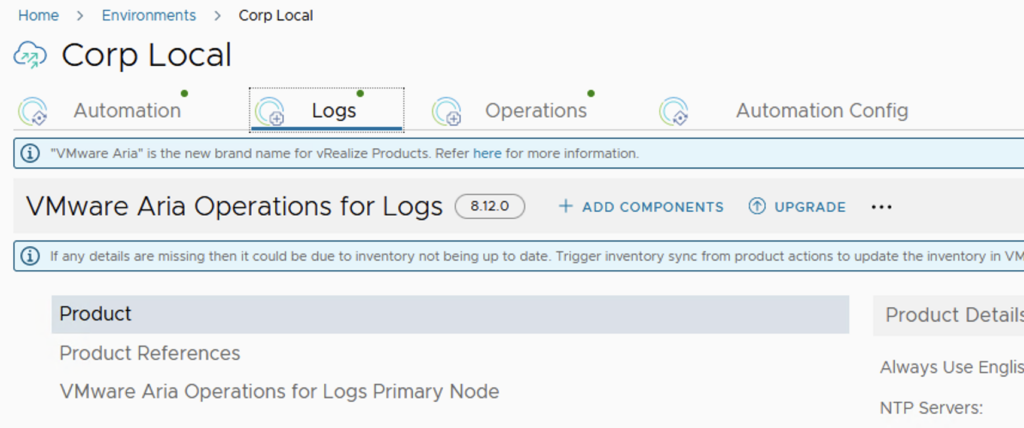
Click on Upgrade

An Inventory sync is recommended if the environment has changed since LCM performed the last sync. We trigger the sync from the UI or click on Proceed to continue

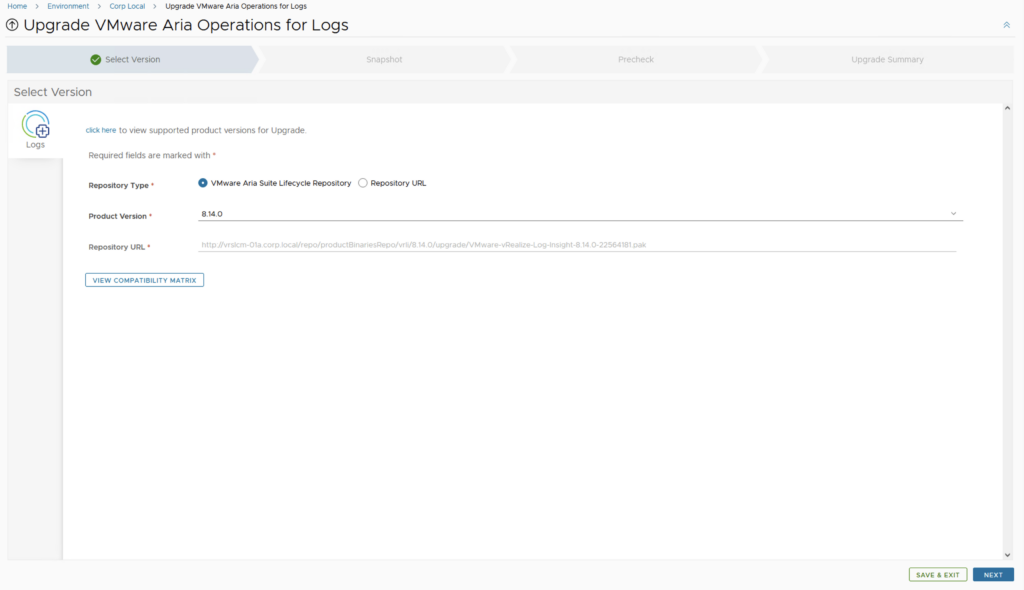
Select product Version 8.14 and click Next. We can also review the compatibility matrix to make sure the environment is compatible.

A new feature that was added was the capability to automatically create a snapshot prior to the upgrade and remove it after the upgrade. On this screen we also have the ability to chose if we want to keep the snapshots post upgrade for validation testing for example. Click next

Run the Precheck to make sure there are no errors or issues.

Once the check is complete we can review the checks that were performed and we can continue by clicking Next.

Review the upgrade details and click on Next then Finish. We are taken to the progress screen where we can follow the progress.

The system will get rebooted and once its back up we will be on 8.14

Since we are doing a major upgrade i strongly recommend to clean the cache before using the new Aria Operations for Logs version.

VMware Aria Operations Compliance Pack for HIPAA

I was trying to find some documentation around the metrics monitored by the VMware Aria Operations Compliance Pack for HIPAA. Since VMware is now including the management pack as a native solution as of vRealize Operations 8.1 I wasn’t able to find allot of documentation around it so I exported the symptoms monitored.

Here is a list of the symptoms from version 8.10

HIPAA 164.312(c)(1) - Integrity - NTP time synchronization service is not configured on the host
HIPAA 164.312(a)(1) - Access Control - Count of maximum failed login attempts is nto set
HIPAA 164.312(c)(1) - Integrity - launchmenu feature is enabled
HIPAA 164.312(c)(1) - Integrity - Unity taskbar feature is enabled
HIPAA 164.312(c)(1) - Integrity - Shellaction is enabled
HIPAA 164.312(c)(1) - Integrity - Independent nonpersistent disks are being used
HIPAA 164.312(a)(1) - Access Control - Default setting for intra-VM TPS is incorrect
HIPAA 164.312(c)(1) - Integrity - NTP Server is not configured to startup with the host
HIPAA 164.312(a)(1) - Access Control - Dvfilter network APIs is nto configured to prevent unintended use
HIPAA 164.312(a)(1) - Access Control - HGFS file transfers are enabled
HIPAA 164.312(b) - Audit Control - Persistent logging is not configured for ESXi host
HIPAA 164.312(c)(1) - Integrity - Toprequest feature is enabled
HIPAA 164.312(b) - Audit Control - Remote logging for ESXi hosts is not configured
HIPAA 164.312(c)(1) - Integrity - PCI pass through device is configured on the virtual machine
HIPAA 164.312(c)(1) - Integrity - Bios Boot Specification feature is enabled
HIPAA 164.312(a)(1) - Access Control - Timeout to automatically terminate idle sessions is not configured
HIPAA 164.312(a)(1) - Access Control - Access to VM console is not controlled via VNC protocol
HIPAA 164.312(a)(1) - Access Control - VIX messages are enabled on the VM
HIPAA 164.312(c)(1) - Integrity - Protocolhandler feature is enabled
HIPAA 164.312(a)(1) - Access Control - Copy/paste operations are enabled
HIPAA 164.312(c)(1) - Integrity - Tray icon feature is enabled
HIPAA 164.312(a)(1) - Access Control - GUI Copy/paste operations are enabled
HIPAA 164.312(c)(1) - Integrity - version get feature is enabled
HIPAA 164.312(c)(1) - Integrity - Informational messages from the VM to the VMX file are not limited
HIPAA 164.312(a)(1) - Access Control - Timeout value for DCUI is not configured
HIPAA 164.312(a)(1) - Access Control - Guests can recieve host information
HIPAA 164.312(c)(1) - Integrity - Users and processes without privileges can remove, connect and modify devices
HIPAA 164.312(c)(1) - Integrity - NTP time synchronization server is not configured
HIPAA 164.312(c)(1) - Integrity - Unity active feature is enabled
HIPAA 164.312(c)(1) - Integrity - Autologon feature is enabled
HIPAA 164.312(a)(1) - Access Control - drag-n-drop - Copy/paste operations are enabled
HIPAA 164.312(c)(1) - Integrity - Intra VM Transparent Page Sharing is Enabled
HIPAA 164.312(c)(1) - Integrity - GetCreds feature is enabled
HIPAA 164.312(a)(1) - Access Control - Time after which a locked account is automatically unlocked is not configured
HIPAA 164.312(c)(1) - Integrity - Versionset feature is enabled
HIPAA 164.312(a)(1) - Access Control - Auto install of tools is enabled
HIPAA 164.312(a)(1) - Access Control - Access to DCUI is not set to allow trusted users to override lockdown mode
HIPAA 164.312(a)(1) - Access Control - Access to VMs are not controlled through dvfilter network APIs
HIPAA 164.312(a)(1) - Access Control - Copy/paste operations are enabled
HIPAA 164.312(a)(1) - Access Control - Managed Object Browser (MOB) is enabled
HIPAA 164.312(c)(1) - Integrity - Trash folder state is enabled
HIPAA 164.312(c)(1) - Integrity - Unity feature is enabled
HIPAA 164.312(a)(1) - Access Control - Timeout is not set for the ESXi Shell and SSH services
HIPAA 164.312(c)(1) - Integrity - Image Profile and VIB Acceptance Levels are not configured to desired level
HIPAA 164.312(c)(1) - Integrity - Firewall is not configured for NTP service
HIPAA 164.312(c)(1) - Integrity - Unity push feature is enabled
HIPAA 164.312(c)(1) - Integrity - Users and processes without privileges can connect devices
HIPAA 164.312(c)(1) - Integrity - Memsfss feature is enabled
HIPAA 164.312(c)(1) - Integrity - Unity Interlock is enabled
HIPAA 164.312(c)(1) - Integrity - Unity window contents is enabled
HIPAA 164.312(e)(1) - Transmission Security - NFC on the vCenter is not configured for SSL
HIPAA 164.312(e)(1) - Transmission Security - Restrict port-level configuration overrides on VDS
HIPAA 164.312(c)(1) - Integrity - Virtual disk shrinking wiper is enabled
HIPAA 164.312(c)(1) - Integrity - Virtual disk shrinking is enabled
HIPAA 164.312(e)(1) - Transmission Security - The Forged Transmits policy is not set to reject
HIPAA 164.312(e)(1) - Transmission Security - MAC Address Changes policy is set to reject
HIPAA 164.312(e)(1) - Transmission Security - SNMP Server is running on the host
HIPAA 164.312(e)(1) - Transmission Security - The Promiscuous Mode policy is not set to reject
HIPAA 164.312(d) - Person or Entity Authentication - Active directory is not used for local user authentication
HIPAA 164.312(e)(1) - Transmission Security - Host firewall is not configured to restrict access
HIPAA 164.312(e)(1) - Transmission Security - BPDU filter is not enabled on the host
HIPAA 164.312(e)(1) - Transmission Security - The MAC Address Changes policy is not set to reject
HIPAA 164.312(d) - Person or Entity Authentication - Password policy for password complexity is not set
HIPAA 164.312(e)(1) - Transmission Security - VDS network healthcheck for Teaming Health Check is enabled
HIPAA 164.312(d) - Person or Entity Authentication - Bidirection CHAP auhtentication is not enabled
HIPAA 164.312(e)(1) - Transmission Security - Forged Transmits policy is set to reject
HIPAA 164.312(e)(1) - Transmission Security - Promiscuous Mode policy is configured to reject

SaltStack Config vs. Ansible Tower: A Comparison of Two Powerful Configuration Management Solutions

SaltStack Config and Ansible Tower are two powerful configuration management and infrastructure automation tools that cater to the needs of DevOps teams across the globe. While SaltStack Config is an open-source solution, Ansible Tower is the commercial, enterprise-ready version of Ansible Open Source. In this blog post, we will compare SaltStack Config and Ansible Tower in terms of architecture, ease of use, scalability, and features to help you make an informed decision on which tool is best suited for your requirements.

  1. Architecture:

SaltStack Config: SaltStack Config employs a master-minion architecture, where a central master server controls multiple minion nodes. This structure enables powerful parallel processing, as the master server can send commands to all connected minions simultaneously. SaltStack uses a ZeroMQ-based messaging protocol for communication between the master and minions, ensuring better performance and lower latency compared to SSH-based solutions.

Ansible Tower: Ansible Tower is built on top of the open-source Ansible project and retains its agentless architecture, where all operations are executed on target nodes via SSH (or WinRM for Windows hosts). However, Ansible Tower adds a powerful web-based user interface, role-based access control, and centralized management capabilities to the core Ansible features.

  1. Ease of Use:

SaltStack Config: SaltStack Config utilizes YAML-based configuration files called “states” to define the desired configuration of a system. The tool uses Jinja2 templating, allowing for dynamic configuration generation and flexibility in managing complex environments. SaltStack Config also offers a secure data management system called “Pillar” for storing and handling sensitive data.

Ansible Tower: Ansible Tower provides a user-friendly web interface, making it easier for teams to manage their infrastructure without requiring deep knowledge of the underlying Ansible Open Source technology. Like SaltStack Config, Ansible Tower also uses YAML-based configuration files (playbooks) and supports Jinja2 templating.

  1. Scalability:

SaltStack Config: The master-minion architecture of SaltStack Config allows it to handle thousands of nodes efficiently, making it a popular choice for large-scale deployments. While a single master server can become a bottleneck in very large environments, this issue can be mitigated using techniques like multi-master setups or syndics.

Ansible Tower: Ansible Tower enhances the scalability of Ansible Open Source through features like clustering, which allows multiple Tower instances to work together to manage large-scale infrastructures. While the underlying agentless architecture still presents some scalability challenges, Ansible Tower addresses them to a significant extent with enterprise-grade features.

  1. Features:

SaltStack Config: SaltStack Config offers powerful features like parallel execution, event-driven automation, and remote execution, making it a versatile and efficient choice for configuration management and infrastructure automation. Additionally, the tool provides extensive support for cloud platforms, container management, and network automation.

Ansible Tower: Ansible Tower builds upon the core features of Ansible Open Source and adds enterprise-ready capabilities like a web-based user interface, role-based access control, job scheduling, and centralized logging and auditing. The tool also provides integration with popular third-party services and supports a wide range of plugins and modules.

Conclusion:

Both SaltStack Config and Ansible Tower are powerful and feature-rich configuration management and infrastructure automation tools. SaltStack Config stands out with its master-minion architecture and superior scalability, making it well-suited for large-scale deployments. On the other hand, Ansible Tower offers a user-friendly web interface and enterprise-grade features, catering to organizations that require a more streamlined and centralized solution. The choice between the two tools depends on your specific requirements, infrastructure size, and the level of complexity you need to manage. Evaluating both tools within the context

SaltStack Config vs. Ansible Open Source: A Technical Comparison

SaltStack Config and Ansible Open Source are two popular configuration management and infrastructure automation tools used by DevOps teams across the globe. Both solutions have their own unique set of features, advantages, and drawbacks. In this blog post, we will compare SaltStack Config (formerly known as Salt) and Ansible Open Source in terms of their architecture, ease of use, scalability, and community support, to help you make an informed decision on which tool is best suited for your needs.

  1. Architecture:

SaltStack Config: SaltStack Config is built on a master-minion architecture, where a central master server controls multiple minion nodes. This structure enables powerful parallel processing, as the master server can send commands to all connected minions simultaneously. SaltStack uses a ZeroMQ-based messaging protocol for communication between the master and minions.

Ansible Open Source: Ansible, on the other hand, relies on an agentless architecture, where all operations are executed on the target nodes via SSH (or WinRM for Windows hosts). This approach simplifies deployment and reduces overhead, as there is no need to install any software on the target nodes.

  1. Ease of Use:

SaltStack Config: SaltStack Config utilizes YAML-based configuration files called “states” to define the desired configuration of a system. The tool uses Jinja2 templating, which allows for dynamic configuration generation. Additionally, SaltStack Config offers a feature called “Pillar” for securely managing sensitive data.

Ansible Open Source: Ansible also uses YAML-based configuration files called “playbooks” to define the desired state of a system. The tool supports Jinja2 templating as well and has a built-in mechanism for managing sensitive data called “Ansible Vault.” The learning curve for Ansible is generally considered to be lower than that of SaltStack Config, mainly because of its agentless architecture and more straightforward syntax.

  1. Scalability:

SaltStack Config: Due to its master-minion architecture, SaltStack Config can handle thousands of nodes efficiently. The parallel execution of tasks significantly reduces the time required for configuration management and orchestration. However, a single master server can become a bottleneck in very large-scale deployments.

Ansible Open Source: Ansible’s agentless architecture can make it less scalable than SaltStack Config in large environments. The performance of Ansible largely depends on the resources available on the control node, as it must establish and maintain SSH connections with each target host. Nevertheless, it is possible to mitigate scalability issues by using tools like Ansible Tower or by employing techniques such as parallelism and batching.

  1. Community Support:

SaltStack Config: SaltStack Config has a robust and active community that regularly contributes to its development. However, since the acquisition of SaltStack by VMware in 2020, the future of the open-source edition is uncertain, and the community may become more fragmented.

Ansible Open Source: Ansible has a large and active community of users and contributors, and it is backed by Red Hat, which was acquired by IBM in 2019. The tool has continued to grow in popularity, and the open-source edition enjoys regular updates and a rich ecosystem of third-party modules and plugins.

Conclusion:

Both SaltStack Config and Ansible Open Source are powerful configuration management and infrastructure automation tools, each with its own strengths and weaknesses. The choice between the two largely depends on your specific requirements, infrastructure size, and familiarity with the tools. While SaltStack Config offers better scalability and parallel execution, Ansible Open Source provides a more straightforward learning curve and agentless architecture. Ultimately, you should evaluate both tools within the context of your environment to determine the best fit.

A Step-by-Step Guide to Convert Native Cloud Virtual Machines to On-Prem vSphere with VMware Converter

Migrating virtual machines (VMs) from a cloud environment to an on-premises VMware vSphere infrastructure can be a daunting task. However, with the right tools and processes in place, it can be a seamless and efficient process. One such tool is the VMware Converter, which enables users to convert native cloud VMs\physical servers to vSphere machines. In this blog post, we will discuss the benefits and challenges of converting cloud VMs and provide a step-by-step guide for using VMware Converter to achieve this goal.

Benefits of Converting Cloud VMs to vSphere Machines

  1. Cost Savings: Moving VMs from the cloud to on-premises can result in significant cost savings, especially for organizations with large-scale cloud deployments. On-prem infrastructure typically incurs lower ongoing costs compared to cloud-based services.
  2. Data Security and Compliance: By hosting VMs on your own infrastructure, you can better control data security and ensure compliance with regulatory requirements. This is particularly important for organizations operating in highly regulated industries.
  3. Enhanced Performance: On-premises hardware can be tailored to meet specific performance needs, potentially providing better performance than cloud-based VMs.

Challenges of Converting Cloud VMs to On-Prem vSphere Machines

  1. Compatibility: Different cloud providers and hypervisors use different virtual machine formats, which can pose compatibility issues during the conversion process. VMware Converter simplifies this process by providing a unified conversion tool.
  2. Downtime: Converting VMs may require temporary downtime, which can impact business operations. Proper planning and scheduling can help minimize downtime and disruption.

Step-by-Step Guide to Convert Native Cloud VMs to On-Prem vSphere with VMware Converter

Step 1: Prepare Your Environment Before you start the conversion process, make sure your on-prem vSphere environment is set up and ready to host the converted VMs. This includes ensuring adequate storage, compute resources, and network connectivity.

Step 2: Download and Install VMware Converter Download the latest version of VMware Converter from the VMware website and install it on a Windows-based system that has network access to both the cloud VMs and your on-prem vSphere environment. The download page can be found here. The documentation can be found here. Take a note of the ports as they will need to be open on the firewalls. Ex for the cloud VM we need incoming TCP ports 445, 139, 9089, 9090, and UDP ports 137 and 138.

Step 3 (optional): In order to be able to revert in case of a failure its highly recommended that we take a backup. This can be achieved by creating a snapshot or image of the VM. Consult your cloud provider’s documentation for the exact steps to create a snapshot or image.

Step 4: Run the Conversion Process Open VMware Converter and select “Convert Machine” from the main menu. Choose “Powered-off source” and “Virtual Appliance” as the source type. Browse to the captured VM image file and select it as the source. Next, select your on-prem vSphere environment as the destination and provide the required credentials.

Step 5: Configure the Destination VM In the VMware Converter wizard, configure the destination VM’s settings such as datastore, network, and virtual hardware according to your on-prem environment. You may also need to resize the VM’s virtual disks or adjust its memory and CPU resources.
Step 6: Start the Conversion Click “Finish” to start the conversion process. Monitor the progress in the VMware Converter interface. The time it takes to complete the conversion depends on the size of the VM and network bandwidth.

Step 7: Power On and Test the Converted VM Once the conversion process is complete, power on the converted VM in your on-prem vSphere environment and test it to ensure it is functioning correctly. Make any necessary adjustments and retest as needed.

Converting native cloud VMs to on-prem vSphere machines using VMware Converter can offer several benefits, including cost savings, enhanced data security, and potentially better performance. By following the step-by-step guide outlined above, you can streamline the migration process and ensure a smooth transition from the cloud to your on-prem infrastructure. Remember to properly plan and schedule your migration to minimize downtime and business disruption. With VMware Converter, you can leverage the advantages of both cloud and on-prem environments while maintaining control and flexibility over your IT infrastructure.

Overview of deploying a 3 tier app in vRA 8, Terraform, and Ansible

Introduction

When it comes to deploying a three-tier application in Google Cloud Platform (GCP), there are several tools available, including vRealize Automation (vRA) 8, Terraform, and Ansible. Each tool has its own strengths and weaknesses, and choosing the right one for your project depends on several factors. In this blog post, we will compare these three tools and discuss how vRA 8 stands out as the best option for deploying a three-tier application in GCP.

Overview of vRA 8, Terraform, and Ansible

vRealize Automation (vRA) 8 is an enterprise-grade cloud automation and management platform that allows you to automate the deployment and management of complex applications and infrastructure. It provides a wide range of tools and services that can be used to deploy and run applications in the cloud, including GCP.

Terraform is an open-source infrastructure as code (IaC) tool that allows you to define, deploy, and manage infrastructure in a consistent and repeatable way. It uses a simple, declarative language for defining infrastructure and supports many cloud providers, including GCP.

Ansible is an open-source automation tool that allows you to automate configuration management, application deployment, and task automation. It uses a simple, human-readable YAML syntax for defining tasks and supports many cloud providers, including GCP.

Comparison of vRA 8, Terraform, and Ansible
When it comes to deploying a three-tier application in GCP, each tool has its own strengths and weaknesses. Let’s take a look at how vRA 8, Terraform, and Ansible compare.
Ease of Use

vRA 8 is an enterprise-grade platform that provides a user-friendly interface for deploying and managing infrastructure and applications. It has a drag-and-drop interface for creating blueprints, which makes it easy to create and manage complex applications. It also provides a centralized platform for managing infrastructure, which can be useful for large organizations with many teams.

Terraform is a powerful IaC tool that requires some knowledge of infrastructure and coding. It uses a declarative language for defining infrastructure, which can take some time to learn. However, once you understand the syntax, it can be very powerful and flexible.

Ansible is a simple and easy-to-use automation tool that uses a human-readable YAML syntax for defining tasks. It does not require any coding knowledge and can be learned quickly by IT operations teams.

Scalability

vRA 8 is designed to handle large-scale deployments and provides many tools for managing infrastructure at scale. It can handle complex application deployments and can scale to meet the needs of large organizations.

Terraform is also designed to handle large-scale deployments and provides many tools for managing infrastructure at scale. It can handle complex application deployments and can scale to meet the needs of large organizations.

Ansible is not designed for large-scale deployments and can be difficult to scale for large organizations. However, it is a good option for small to medium-sized organizations that need to automate simple tasks.

Flexibility

vRA 8 is a very flexible platform that provides many tools and services for deploying and managing infrastructure and applications. It can integrate with many other tools and services, which makes it a good option for complex environments.

Terraform is also a very flexible tool that provides many options for defining infrastructure. It supports many cloud providers and can be used to deploy complex applications.

Ansible is a flexible tool that can be used for many different tasks, including configuration management, application deployment, and task automation. It supports many cloud providers and can be used to automate many different tasks.

Cost

vRA 8 is an enterprise-grade platform that requires a license and can be expensive for small organizations.

Terraform is an open-source tool that is free to use

Ansible is also an open-source tool that is free to use.

Why vRA 8 stands out for deploying a three-tier application in GCP While Terraform and Ansible are both great tools for deploying infrastructure, vRA 8 stands out for deploying a three-tier application in GCP for several reasons.

Firstly, vRA 8 is a powerful platform that provides a user-friendly interface for creating blueprints and managing infrastructure. It is designed to handle large-scale deployments and provides many tools for managing infrastructure at scale.

Secondly, vRA 8 provides many integration options with other tools and services, which makes it a good option for complex environments. It can integrate with many different cloud providers, including GCP, and can be used to automate complex application deployments.

Finally, vRA 8 provides many advanced features, such as self-service provisioning, policy-based governance, and cloud cost management, which makes it a good option for enterprise-grade applications.

Conclusion

When it comes to deploying a three-tier application in GCP, vRealize Automation (vRA) 8, Terraform, and Ansible are all good options. Each tool has its own strengths and weaknesses, and the best choice for your project depends on several factors. While Terraform and Ansible are both great tools for deploying infrastructure, vRA 8 stands out as the best option for deploying a three-tier application in GCP due to its powerful platform, user-friendly interface, and advanced features.